I have been fiddling around electronics for sometime now and earlier this year started a course with N.R.I. Schools in Micro Processors and Micro Computers. Presently I am an Information Systems Manager at a hotel but I really love electronics. I have fix quite a few equipments. (Have not had any complaints of fire after my repairs either) . However I am still a novice - Pro Wannabe and I believe that with guidance from guys like yourself and others someday I too might become a pro.
Hey any chance of me renting your knowledge for a month or two?. Oh well I didn't think so either but just checking. Man, I have quite a number of appliances laying around the house. Mostly for friends. Well you see they seem to think that whatever broken equipment they have, MacGyver can fix it.
MacGyver - Yeah thats what they call me. That was from a television series some years ago staring Richard Dean Anderson or was it Robert Dean Anderson, Well lets just say "Something Dean Anderson". Now he was something else. I once saw that guy broke an egg and empty its contents in a car radiator to stop a leak. Well Thats television for you.
Oh about that equipment - Yeah I do have quite a few. VCRs, televisions, computer monitors, CD player and even an electronic scale.
Well a part of my problem is that unlike you I cannot go to the library to get a copy of a Sams'. What are you inquiring about .... Service manual for a Panasonic PV2822?. What the hell is that. You see I am living in Jamaica. Where? Oh that's a little Caribbean country about 90 miles south of Cuba. Its total area is about 4411 Sq. Miles with a population of around 2.6 million. Home of the now famous reggae music. Also produces world renown Blue Mountain Coffee. Has produced some world class athletes in track and field the likes of Herb McKinley, Donald Quarrie, Bert Cameron. Did I say has produced?. That was a slip of the tongue. We are still producing - Merlene Ottey, Deon Hemmings etc. etc. Hey we even have a bob sled team, but listen it has never snowed in Jamaica. Ha. Ha. Well there are quite a few achievements to make us proud but to have Sams' Photofacts in the library, We are not there yet. Still a third world country....perhaps one day.
Probably when we have become close friends then we can work something out but for now - grope grope in the dark. Do you think if I share some symptoms you might be able to help? Well I do not own a scope. Have never seen one except in magazines. I have download something from Sci about them thought, will read that later. I have a DVM, pliers, screw drivers, etc. The basic tools really. Well let me tell you about a patient:
Well that sounds like the video heads might have done its days I thought. First thing I did was to remove cover. Lift main board to get to head. Close scrutiny shows head appears to be worn and the color seem sort of brownish not shiny bright. I wonder what they use to clean head. Some of those cassette cleaners not any good. How about some manual cleaning. Some isopropyl alcohol and tissue from the bathroom and some gently rubbing on head, tape guides, pinched roller, etc.
Now to test. Circuit board not screw back in position but set so that nothing will short against any metal parts. Connect to TV. Plug into A/C line. No Variac or Isolation transformer that Sam refers to so often. Need to address that but for now .. .Power switch press. Display lights up. Channel 2 on display. No local station uses that channel and cable is not attached. Menu appears on TV, "Numeric key to set date and time etc. etc.
Now for a cassette. That is inserted. Safety tab on cassette is removed so play come on automatically. All mechanics seems okay, tape properly wraps around drum and alas picture, best I have seen on this TV since I fix it 2 years ago. I was attempting to tweak it then, when I use a minute metal screw to adjust - what is that part called .. IF or RF transformer for cleaner picture I reasoned. Well the darn screw driver crack the core or was it the person using the screw driver? Well the picture has been somewhat snowy since perhaps one of these days I will fix that but back to video at hand.
Picture cool, sound awright just screw it back together and hook it to the better working TV and watch a movie. Just got 2 movies to borrow from my cousin. Well Stop, Eject and power. Off goes connector to tv and out goes power cord. Oh did I mention a small spark from the socket the first time I plug in into the ac line. I have seen that every now and then I wonder if the socket terminals are somewhat corroded well I will check that one of these days....
Time to screw up (no pun intended) VCR. Enter my 4 year old stepson and his 5 year old uncle. "Hi dad You said you were going to allow us to help you fix video". Man why do young kids have such good memory. This I told them earlier on when they were refusing to go for their bath. "Well your time now" I said go get two phillips screw drivers. Well they know were the tools are kept sometimes I have to ask them were my tools have disappeared to.
Well it is a good thing they only visit during holidays or I think I would be mad by now but then again probably I already am. Well they are back and they look ready to screw. No No Not that type of screw Sam. These are kids, oh boy!. Well I carefully inserted the the main board back into its position making sure all wires are intact. I inserted all the screws putting about two turns on each with my finger. Okay guys your turn. I showed them how to finish inserting screws a few minutes later they were through. No No I did not leave them to do it by themselves another few years perhaps but for now I was right there. Well with the main board out the way I replace the cover and with the boys help screwed it in place.
Now to go watch the movies. Movies in a few minutes I announced to the rest of the household. I hooked up Video to properly working TV, plug into A/C line again that little spark - different socket this time - Well this is an old house. Power, display lights up and menu comes up on t/v well now insert cassette. In goes cassette, on comes play, sound but wait NO PICTURE. FAINTLY detected ghost wiggle but NO PROPER PICTURE. EVERYONE NOW TAKING THERE SEATS. Wiggling of cable bring no change. Well I must have missed something when WE WERE SCREWING it together. Well off comes cover, up comes board, close visual inspection reveals nothing amiss. Well what the &$#@ went wrong. By now I am back to snowy Tv set still no picture. Gently prodding of circuit board yields no change. Another quick clean of head - Nothing. A hour and a half later still nothing. By this the theater - I mean the living room is empty. Someone making a wise crack about me working on the projector. Well What am I not checking. When Power is applied the startup menu is displayed - Set date time etc on t/v. Did I check the channels from the video No. Well antenna is attached to video and local channel is selected on video, vcr/tv switch is check vcr selected. Well what do you know still no picture. Whenever a channel is selected for which their is no signal there appears to be horizontal lines on t/v however once one with a signal is selected good sound put faint ghost and lots of snow. Did I say it never snow in Jamaica.
Well it is getting late and I have to be up early for work in the morning so I not going to stay up with Mr VCR anymore. Why did you have to do that to me I ask?. Well now I know that I am really tired because I sure I hear it mumble something about me allowing kids to poke around in his belly. Well just my imagination probably.
Well Sam that was yesterday. Have not looked at it today. But I have been thinking - That fact that there is no picture at all neither from the tuner circuits or from the video circuits then the problem is in a circuit that is common to both could it be power problem?.
Knong Kong Heht Hett - Now what is that. Ah my little 15 months old niece. Heh heh Hoh hah - Sam she is wearing her Mother's Shoes. Well I think she is here to continue her computer class we started the other day.
Sam I have to say bye for now. Hoping to here from you soon. Anxiously awaiting your advice. In the meantime I continue to read your articles. This young lady is pulling on my pants trying to get on my lap. Now where did I put that Dr. T's Sing-A-Long CD. "Raat raat" - No baby, Not a rat. It is call a mouse, Kids .....
Sam it was nice to hear from you. I have noted all your recommendations and will be posting a few questions to Sci.Electronics shortly. Well after reading your chapter on "Incrediblely handy widgets". I decided to construct the Visual Load Indicator - . Like yourself I wired a dual outlet box in series so both the equipment under test and the lamp can be plug in. My problem now is understanding what wattage bulb to use for what equipment.
You see I constructed it last night - NEW YEARS EVE - Well who cares, I was doing what I like. I was at my own New Year's Eve Ball. The equipment I was testing it on was a 14" Samtron SVGA monitor Mod# SC441V. This patient was busted up somewhat, but I will tell you about that some other time. For now I had just replace a voltage regulator - STR 58041 = ECG 7078 (Yeah I have an ECG Cross Reference manual 96 version). This had a short between pins 2 & 3. Base and output if I remember correctly. I also replace two C1008 transistors with 2N2219A, A 1K resistor 1/4 watt and a RPG15G diode - This is rated at 600 prv 3amp so I used one rated at 1000 prv 3amp. This was only for test purpose as I will try to located a original or one of similar ratings.
No I have not noted any shorted are open capacitors as yet. Well time to test. The monitor is rated at 70 watts 0.5 - 1 amp. My newly made visual indicator is connected and I am using a 40 watt bulb. My bulb holder is one of those with a switch on it. Am I wearing rubber boots? Yes and one hand struct deep down in pocket. Wait Wait What is this?. A huge hole in my pocket - On so that was how my $500 bill escaped. Sam 500 Ja.$ is about $15 in Uncle Sams currency. Well you gain some, you lose some, that's life. Still I will show this torn pocket.....
Now back to the matter at hand. Burr Rum Burr bum (Is that how a drum sound Sam). Well drum roll and all and POWER. Now what do you know?. Awright Sam Awright - I am just learning not as experience as you but one of these day ...... . Yes bulb shines brightly. Well Sam did say If bulb glows bright then shorts probably exits - now what could that be. Now give this a little thought and ... Okay if degausing cable is still connected then that might provide a low resistant path for current back to bulb... One way to find out. Power Off, degausing coil disconnected. Power on. No glow from bulb, no wait there is a faint glow on the filament. Now what still no sign of life from my patient SAM err err I meant My patient SAMTRON. Now what would Sam the man with Gold in his name have done. Well I remembered him changing the wattage of the bulb a few times I wonder if.... . Can't see any harm in that. Well I do have a 100 watt bulb. Now that is fetch and quickly replaces the 40 watt. Power. Ahah bulb is glowing but not brightly AND THERE IS A HORIZONTAL LINE ON MONITOR THAT IS SLOWLY OPENING VERTICALLY. AND there is also letters on the screen. Not quite legible but there. Oh I did hook the monitor to a old 386 PC that had no hard drive or key board. Yes is has memory. About 2 mb. The rest will be added later. You know me one of these days ......
Well I suppose this monitor needs more current so I will just disconnect this visual tester and plug it in ac outlet. My Next gadget must be an isolation transformer and also a variac. I already have a few transformers and also a line conditioner. I could probably convert that to a variac. I could asked on Sci about a circuit diagram or perhaps Sam can help. Back to monitor. Degauss is connected and monitor plug in to ac. Power. Yes Yes monitor lights up beautifully. It i s a bit bright but that is soon corrected with a little adjustment to the brightness control on the front of monitor. Now I see the booth up and error message on monitor as 386 tries to booth without a hard drive or floppy drive. Now to let this run for awhile. How about rebooting computer. Okay. Power Off. BUZZZZ Buzzz. Now What the hell is that. The back of monitor is still off so visual inspection is easily done. Power Off. Plug pulled from a/c. That sound seem to be coming from somewhere in the vicinity of the newly installed regulator and that many legged transformer that it is close to. In fact in is connected to a heat sink that have a portion hovering over the transformer. A quick check using a finger as heat detector on newly install parts - CAREFUL NOT TO TOUCH ANY METAL PART - FILTER CAPACITOR NOT DISCHARGE ALSO STAYING FAR FROM HV CIRCUIT - revealed nothing until i came to the newly install diode. The one with the 1000 PRV Instead 0f 600. Well that is rather hot. Well what does this supply. From tracing the circuit I saw 24 volt written on PCB and it goes to quite a few components. Well I suppose one of them has a problem that is causing my little silicon friend to over work and sweat - I mean heat up too much. Well let me just check this voltage. All connected and power up. Monitor lights up. With my DVM I checked - 23.9 volts after a few seconds buzzz buzzz. Power off. Diode is quite hot. Well it is almost midnight now. My fiancee seems to be asleep and hey she is hugging a pillow. Well I've got to start the New year right - think I better get to bed and replace that pillow. She did say she wanted to be up when the New Year arrived so she won't mind if I wake her Plus Sam did say NOT TO WORK WHEN I AM TIRED - Well at least not on any thing electrical. Well that was last night and the rest is history. This morning I got your letter and now I reply. Later I will attend to patient SAMTRON. NO Success then to Sci.
How do I determine what wattage bulb to used on equipment under test?. Gotta say bye for now. Looking forward to hearing from you soon. All the best for New Year.
Now what is that sound. Oh Oh 15 month old niece. Sam I have not fully recovered from that last lesson. Gotta find somewhere to hide , Gotta find somewhereeeee ..........
About your comments on that diode!. Well the only difference between the original and the one I installed is the PRV. Well this is based on data in ECG Manual. I check on the original and also the replacement. It is in the secondary supply. On the other hand - Would a problem arising from the switching function of this diode results in that buzzing sound that I am hearing?. Sound only appear after unit is turned on for a few seconds. In fact the first time I heard it was when I disconnect the signal cable from PC to monitor. Well I guess I could double check that.
Until I hear from you "TEK CARE AND WALK GOOD" - (Jamaican dialect) - Means "Be careful and watch your step".
MacGyver
I just wanted to pass on thanks for info on monitors. I read your 'Why I do This' note and agree with your philosophy.
I have fixed countless VCRs, TVs etc just to stop them from going into the dumpster. Todays society is so much a toss it in the bin generation. If people don't want it back when I give them an idea of its cost I fix it anyway and donate it to charity or some poor starving student. If I can ever help you proofread or sort info let me know as I have time at work between trouble calls. I too have tried just about everything (cars, motorbikes, lawn mowers, built a house). I work as a tech maintaining air traffic radar and navigations systems.
In exchange for your info I offer this story:
One of the guys I work with brings in his brothers big screen TV that's belly up. When quizzed he doesn't really want to talk about it or whats wrong with it. So now we are really interested. It turns out that it has had water spilled in the back. Well we had all ran across this before so after much guffawing and insulting of his lineage the story comes out. His brother had the customary spider plant on top of the TV. Well sometime not long after he bought it the bottom third of the screen folded over and left a black bar at the bottom.
Because of the size of the TV he just left it that way for more than a year. Then one day he watered the plant a little too exuberantly and smoke came out of the back. He quickly unplugged it and left it wisely to dry out. Well when he plugs it back in several days later it is cured of its fault! The TV works perfectly for a month. Then the fault comes back, but he knows what to do. You guessed it, he gets out the watering can and pours water! In the back of his LIVE TV set. Why he didn't end up as a pair of smoking sneakers was only luck. Needless to say the comments on his genetic structure flew fast and furious.
Enjoy and keep up the good work.
Patient: RCA model 1050 M-F (maybe that means it only is guaranteed to work on weekdays? :-).
Symptoms: Ejects discs instead of playing them.
Testing: Same behavior with multiple discs.
So we finally bought the world's cheapest CD player, which is an RCA model 1050 M-F. Fabrique en Chine, as one would expect. Worked fine until I decided to horse around and try to play the free CD that came in the mail from Microsoft the other day. Not surprisingly, it didn't play. Lots more surprisingly, our audio CD's won't play now, either, and Natalie won't believe that I didn't wreck the thing by trying to play a computer CD in it.
The symptoms are: You put a CD in and push the button to close the drawer. CD starts to spin up and then the drawer opens. The drawer never, in normal use, opens automatically. So I took the cover off and lugged machine over to the kitchen table, where it worked fine. Put cover back on, still worked fine. Re-installed it to Natalie's ancient Montgomery Ward receiver and it started with the music critic act again: put in a CD, it pushes it out again.
I didn't think that the fool drawer motor was connected into the microprocessor circuit. Does anyone have any ideas? Help?
(From: Vlad (vlad@chaos.bme.ohio-state.edu).)
"I'm also a happy owner of a similar CD player.The situation has progressed as follows: With the deck on the kitchen table and playing normally, I poked and prodded everything with the power on and the cover off. I noticed that one of the ribbon cables from the CD mechanism to the circuit board was sensitive to my prodding: when I'd push it with my finger, the sled would start to search and focus and stuff. Solder joints and everything looked fine, and the problem seemed to clear up after I removed and replaced the ribbon cable plugs. Plugged it back into the amplifier, and out the drawer comes--the machine won't play a thing. Back on the kitchen table, the thing plays fine.When I was inside it :), I noticed that the drawer is kept in locked position with a tiny plastic hook, and instead of metal spring to move the hook to locked position, they used plastic. At first, I could not believe this thing could work at all. The cover (or drawer?) is pushing a little switch, when it is locked. It has no other connections to anything important. If you can locate this little switch, you could try to press it and play the CD. Or try just to keep the cover closed with a hand ant try to play. Perhaps, this stupid cover locking mechanism does not functioning right."
I notice that the ribbon cable seems sensitive again. I don't know how long it took me to figure out that it was sensitive when I poked it with my finger but not when I poked it with a pen. (Not that long, actually--I used to be fairly accomplished at audio repair before CD's came out, and I'm suspicious of everything.)
To make a long story shorter, I've got an rf shielding problem. We have, it turns out, a strong AM radio station near the house, and the problem showed up after I plugged the power wiring of the stereo system in somewhat differently. In fact, the CD player works like a loop antenna. If I rotate it 90 degrees in its location on the shelf, it works better--hesitantly, skipping, but still trying.
The drawer mechanism is presumably involved because this thing has a remote control and simple pushbuttons to control things like the power and the drawer. These buttons activate interrupts to the microprocessor, which then executes the desired command. Apparently the rf is getting to the microprocessor and scrambling things.
I noticed late last night that the machine had settled down remarkably, and that the ribbon cable wasn't particularly sensitive to my massage techniques. I'm very glad I also noted that the radio station had gone off the air for the night as well: this morning, the drawer was up to its old tricks again.
I will discuss the problem with the dealer, but I don't expect much help in that direction. Then I will get at it with various remedies like 0.05 uF disk capacitors from power and audio cables to ground.
I haven't put the steel case back on the machine yet, though it's apparent from the construction of the player that they paid considerable attention to shielding and that they expected the case to be in place. I will apply my capacitors and maybe some ferrite beads and then put the case back on.
Sheesh.
Natalie was convinced that what I should do is to move the thing the next shelf up, away from the TV set. I had to explain to her that that wouldn't do any good because the TV set wasn't affecting the CD player by its unplugged presence. Back to work:
Having determined that the problem was shielding and bypassing, I checked my cabinets of little plastic storage drawers. Only the faded labels on these give evidence that they were once organized. They're now filled with random junk of a vaguely electronic nature. However, I found some 3-legged ceramic disk capacitors with ferrite beads on two legs. These were from a Radio Shack surplus capacitor assortment and were obviously meant for rf suppression purposes. I put one on each of the audio outputs, grounding them to the board ground. I also stuck one on the audio cable shield. Just for good measure, I stuck a big old 2kV 150 pf ceramic disk capacitor across the power line, which was already equipped with series inductors. I tightened everything that looked like it had anything to do with shielding and checked the continuity of everything thereof.
Stuck the case back on, paying particular attention to the single screw that connected the case to the ground. Set it on the shelf, plugged it in, put in the test CD. Spun right up!
And two seconds later, the drawer pushes open. Did it again, and again.
So what the hell. I took the books off the next shelf up and put the CD player up there. Plugged it into receiver and power.
That's the Bach Double Violin Concerto playing in the background.
From Sam:
Natalie is delighted, I must say.
Plugging the cables in did indeed affect the symptoms. A bit of experimentation showed that the cable shields seemed to be carrying in more rf than the core conductors: no effect when just the center pin of the RCA plug was inserted, but we got hunting and stuff when the shield made contact. Just touching the plug shield to the jack shield without the pin's being inserted caused disturbance.
BTW, I tried the Microsoft disk again. No sound, but no skipping.
From Sam:
Well, I just wasted nearly half my night on this piece of junk. Problem was that it wouldn't read CDs, but if you turned it upside down it would. The pickup would then slip out of alignment and start clacking. It took me an hour to get it apart (This is a Magnavox AZ6822) because of the stupid screws, I couldn't find screwdrivers to reliably get them out. When I got it apart, the design inside was simple enough, and I decided to take out the transport. I removed the transport, which is nicely supported by springs that fall all over the place. Well, I got the thing out, and you cant even tell what is wrong with it, because it isn't related to the circuitry. Well, I figured out that as you know, the lens slides along a metal bar, well at one end, a little plastic clip was missing. I figured this was logical since the unit was dropped about 5 times on concrete. Well, there I was, No clip, pickup mechanism out, what was I to do. Well, I found a seemingly unlikely solution. A piece of a broken Rod Antenna, the end was crimped, so I cut it off with tin snips. Well, what do you know, same thickness and width of the clip. I cut it to size, and put it in. Reassemble, and Bingo works like a charm, reads the CDs, plays fine. This was absolutely the worst CD player design I ever saw. Easy to scratch discs, eats batteries, but it took 5 falls on concrete to break it.
Editor's note: This one is a great example of persistence despite what would appear to be a hopless cause - a piece of equipment that has been previously butchered!
This car radio I bought at a garage sale in a hope to install it in my daughter's car if I could fix it. Evidently somebody had worked on it before because I could see signs of sloppy soldering job here and there, a few burned traces jumpered with wire, and also the 2 flexible wires between the LCD panel to the CD mechanism were not there at all. I fixed the obvious damage and used flat ribbon cable to hook the CD mechanism up.
At this point, the radio part started working. Attempts to play a CD did not succeed though: the disk gets "sucked" in normally, just sits there without rotation for a few seconds and then is ejected.
The laser is working: to check that I took a junk CD and sanded out a small portion of it where the pickup is located to make it transparent. This method works great by the way: I could easily see from a safe angle the tiny deep red spot inside the disk material without even having to turn the lights off.
From the following, I came to the conclusion that the the YM7121 chip was bad. I spent hours carefully checking everything else step by step (by the way, thanks for the great web page that you maintain: I found plenty of very useful information there).
Check on the focus search signals showed that none are generated. This led me to checking the IC in question, which is the main CD controller. I have the schematics, so I was able to compare the voltage levels on the pins of this chip to the ones indicated on the diagram. Only the VDD (no wonder) and some of the input signals are within the expected values. Rest are wildly off mark. But this is not all. The VCO test pin shows no oscillation at all (yes, I used a scope), and even the 16.9 MHz XTAL oscillator is not running. I checked every of the few components around the crystal and the crystal itself, everything is fine, so evidently there is something wrong with the oscillator amplifier inside the chip.
My last experiment was to take the crystal off the board and put together a quickie 74LS00 oscillator around it. Once I had this working, I tried to feed the 16.9 MHz signal into the XTAL IN pin of the YM7121. My hope was that if something went bad with the feedback in the OSC amplifier in the chip, I might get the chip to work by feeding it an external clock. No such luck :-{.
The output of my oscillator gets quite heavily loaded, everything else remains the same. At this point I accepted the grim fact that the YM7121 is fried. I agree with you, this is the last thing to happen, but I can suspected that whoever worked on this unit before might have burned it by accident.
So I need to replace a Part Number is YM7121C, 80-pin PQFP package.
I have not quite given up yet, so I will keep playing with it until I either return it to life, or say to myself "enough is enough". I placed an order for the replacement chip with Fox International Ltd (yes, I was surprised myself to find a place where you can actually order something like that).
It is an 80 pin WFP surface mount part. Yes, I do have certain experience with SMT rework which I have done on computer boards, so replacing the chip is not gonna be a problem.
But the best experience I had was with the hybrid metal/glass CRTs. That is, the ones which had a bare metal cone as the 2nd anode, and the glass parts (the screen and the electron gun assembly) welded to the metal on each side. Great way to learn about the safety issues when you have one third of the set having a dozen of kilovolts on it :-) :-). Just to add to the issue, most of these sets had a transformerless power supply. Nasty...
Let me update you on the CD player status. First, my determination to fix it was not because I want it so bad, but because of the great learning experience I have been getting in the process. Also, I am sure you are familiar with that feeling of satisfaction when you bring a seemingly hopelessly dead thing back to life.
You probably already figured out that I had some major progress. Yes, the thing is now working, flawlessly.
I got the replacement chip last week ($27 plus shipping, to answer your question) and replaced it on Sunday. Sure enough, it did not start to work right away. Even though the 16.9 MHz oscillator seemed to be doing something (remember, with the old chip it did not oscillate at all), the frequency was somehow 2 times higher (33.8), and looked very noisy on the scope. Nothing else worked, the DC voltages on most pins were still wildly off the expected values. After fighting with it for some time, I suddenly remembered the golden rule: "if too many things seem to be so wrong, that you fail to even understand, how they could be so wrong, check the ground connections".
I started testing the pins on the YM7121, which were supposed to be on VDD and GND. Surprise: pin #77, which should be at the GND according to schematics, in reality is not. So are a few components around this pin which used the same PCB trace.
After rechecking my diagnose, I bridged the trace to the nearest ground, and turned the thing on. Viola! The VCO came on. Quick adjustment of the PLL free run frequency to make it 4,35 MHz, power off, reconnect the pickup, power back on. Yes, the disk starts spinning, I hear the buzzing of the focusing coil and even bits and pieces of sound start coming through. Next adjustment: E-F balance, brings only a marginal improvement.
OK, let's see what we have on the RF test points. The scope shows an eye pattern, but very shaky and jittery one. Suppressing my doubts I start tweaking the optical alignment screws. At some point the inner tracks start playing much better, but with lots of skipping and re-search attempts. The outer tracks are much worse no matter how carefully I try to find the proper alignment.
OK, maybe this is because all this time I had the CD mechanism upside down (this is the only way to reach the PCB and all adjustment points).
Turning the mechanism the right side up makes matters a lot worse: even the disk index search fails 100%, alignment screw does not help at all.
This tells me that something is wrong with the turntable adjustment.
Accessing the turntable requires a lot of disassembly (all these tiny screws and springs), but finally I am able to measure the turntable height. Yes, there is a problem: the manual shows that the height should be 5.0 +/- 0.05 mm, while I measure only 4.7 mm. Figuring out how to adjust the height takes quite a while, but finally I am on my way back assembling the thing together.
Power on: this time everything starts playing just great even before I re-adjust the alignment. Final adjustments on the first and the last tracks: great, the eye pattern is now clean and stable, the player works great the right side up, and even turning it upside down does not change anything.
Conclusion: Obviously, the chip I cruelly cut out and replaced, was not guilty at all, but hindsight is always 20/20. The fault in the PCB trace underneath the chip is probably a microscopic one, since I did inspect this part of the board when I removed the old chip and did not find anything unusual.
Editor's note: The following is an excellent example of methodical, logical troubleshooting, taking appropriate precautions, and monitoring behavior leading to a successful diagnosis.
BTW, the gradual deterioration of performance/change in current is a good indication of a component drifting. This is going to most likely be a capacitor - bad solder connections, coils, and transformers don't drift but usually change their characteristics suddenly.
Good work!
My client asked me to repair his 5 year old Sony television which failed to power on. I put it up on the service cart, plugged in the line cord and tried to power it on. I heard a tic-tic-tic sound coming from the switching power supply board F. A quick check of the power supply was done with the ohmmeter but nothing obviously shorted or open.
Then I removed plug F61 from the power supply board, pressed the power on button on the set and the switching power supply began to work, I could hear the audio amplifiers working through the speakers. Something in the television chassis was loading the power supply down. I metered the brown wire on plug F61 (B+ supply) and found it shorted to ground. Then I tested the horizontal output transistor Q503 and it was shorted.
I inspected the flyback and other high voltage components and seeing nothing else shorted replaced Q503 (2SD1941) horizontal output and Q502 (2SC2688-lk) horizontal driver with exact replacements. Now, I know that frequently horizontal output devices are over-stressed by some other defect in the chassis so I prepared for this possibility by removing B+ jumper wire JW-41, inserting a 5.6 ohm 10 watt resistor in its place and clipped my voltmeter leads across the resistor. This gave me the ability to monitor the current being consumed by the flyback transformer.
I powered up the set slowly using a variac and an isolation transformer, the picture was good. I adjusted the variac for 125 volts AC, set the customer picture controls on the Sony to midway, (brightness, sharpness) and the Trinitone to LOW. I tuned to a music video channel on cable in order to observe the raster changing frequently from dark to light, and recorded a voltage drop across my 5.6 ohm resistor of 2.2 volts with a dark raster to 3.98 volts with a white raster.
After 10 minutes of operation, the voltage across the resistor began to climb even though the raster was fairly dark at the time. At 5 volts the right side of the raster began to shrink, and after about the loss of 3 inches of raster from the right side I powered the set off, alas there was more trouble in this set for me to debug. I inspected for problems with the scan-derived B+ voltages, pin cushion correction circuitry, deflection yolk and retrace tuning capacitor, nothing found defective! The trouble- shooting breakthrough came when I replaced a 0.47 mfd electrolytic capacitor (C525) which coupled the horizontal drive signal into the base of the horizontal driver transistor and C537, a 4.7 mfd electrolytic capacitor in the horizontal driver circuits. These two capacitors had weak- ened and had resulted in the eventual failure of the horizontal output transistor. I checked the horizontal waveform on the base of the horizontal output transistor and it looked OK. So I removed the 5.6 ohm resistor, soldered B+ jumper JW41 back in the circuit and tested the set for 6 hours.
The Sony worked fine and has continued to work for my client for 3 months now. Thank you for listening.
I had to replace all three crt's in a mag projection TV. The "new" crt's were rebuilts. I usually do the blue and green first. Remove one, drain it, new crt, fill, reinstall,, fire up the set and "rough-in" the alignment, then move on to the green...do all the same then the red last. Yeah I know, should do the green last, but I have had both blue and green out before to change the fluid so red was really my reference....
so anyway.... I the green jug is in and the sets fired up... I reach up to grab the yoke to position it and WHAM-SNAP I get bit by HV. right from the anode cup... Not just one snap mind you, but snapa-snapa-snapa-snapa !!!!
Shit, I have done this the same way for years....Well you never know when its gonna getcha, heheheheheheh
The only way to learn is to make mistakes. I've been learning electronics for over 25 years now (!), and I still make mistakes. I fact, the last mistake I made when repairing something was last night - I unsoldered and replaced a 40 pin chip in a Tektronix computer before realising the fault was simply bad keyboard contacts (!).
Of course, as my skills have progressed, I make fewer mistakes that cause more damage to the equipment. I learned years ago never to overrate a fuse unless there were _very_ good reasons, and I learned somewhat more recently that it was a good idea to test a PSU into a dummy load before connecting the rest of the machine. I learned both those things the hard way. If I'd simply read them, I'd probably still be making the same mistakes.
People who are learning often make things a lot worse. I think most regulars here will agree with that. But that doesn't mean they shouldn't learn. Yes, it does mean they shouldn't (IMHO) 'be helpful' and try to fix other people's stuff for money. What they should do instead is obtain old stuff that would be thrown out anyway (and there's a heck of a lot of it about), and have a go at fixing it. If you make it worse, you've not lost much (and you've probably added a lot of spares to the junk box, and learned what not to do next time), and if you fix it, well, you've learned something as well, and got a working whatever.
I have lost count of the perfectly repairable VCR's and Stereos that I've written off because of secondary damage caused by well-meaning 'buddies'.
The worst one of those I ever saw was a Solartron DMM. The real fault was simply bad contacts on the switch-bank, but the idiot who had it before me had randomly replaced FETs with bipolar transistors ('the old ones didn't test right'), zeners and constant-current diodes with 1N4148s, etc. The result was that the _very_ expensive custom chip had died. Yes, it was worth repairing, but only just.
This is a on-going project on finding information and restoring a strange HeNe laser acquired by: Chris Chagaris (pyro@grolen.com). Research to determine the specifications and requirements involved postings to sci.optics, email correspondence, and a bit of luck - seeing a photograph of the mysterious laser in a book on holography.
Here is the original description (slightly reformatted):
(From: Chris Chagaris (pyro@grolen.com).)
I have recently acquired what I have been told is a 35 mW Helium Neon laser head. However, it is unlike anything I have ever seen before. (See the diagram, below.)
                Capillary tube/external starting electrodes

   Starting pulse  o-------+----------------------+
                          _|_                    _|_
    ||     //==================================================\\     ||
    ||   //=====. .==================. .=================. .=====\\   ||
                |||                  | |                 |||
  Mirror        '|'  25K             | |           25K   '|'        Mirror
         Anode 1 +---/\/\---o +HV    | |   +HV o---/\/\---+ Anode 2
                     .---------------' '--------------.
                  ---|-+                            +-|---
                     |  ) Main               Spare (  |
                  ---|-+                            +-|---
                     '--------------------------------'

              Gas reservoir with heated cathodes and getters
Jodon Laser Head shows the construction in more
detail.
Here is one reply Chris received by email from someone else named Marco. As you will see, this turns out to be a dead end.
(From: Marco.)
"Hi Chris,This seems to be a really old one, or from other location than west Europe, Japan, and the USA. The 'SM' could be an abbreviation for Siemens, they had manufactured lasers from 1966 to 1993; until last year Zeiss/Jena has taken over the production; and since 1997 Lasos has overtaken the production by a kind of management buy-out. You can send them the number, it will be possible that they know it. Contact Dr. Ledig. I will also look around if I can help you further.
HeNe lasers with a heated filament are no longer built. To see if it still runs you can attach a 3.3 V supply to the filament and see if it glows red, not more, to much heat will destroy it. You could use transformers from tube amplifiers for the filament and an old HeNe laser power supply for the anode.
This laser will need around 5,000 V and 10 mA I think. If you could only get a smaller power supply, you may not see any laser beam, but you can see if it will trigger."
(From: Sam.)
Here are my 'guesses' about this device. (I have also had email discussions with Chris.)
I agree with much of what Marco had said.
(From Chris (a few months later).)
Well, tonight while looking through the "Holography Handbook" I spied what looked suspiciously like that elusive laser I have. It said it was made by Jodon Engineering Associates of Ann Arbor, MI. I immediately called them and was fortunate to have the engineer (Bruce) who has built their tubes for the last 18 years answer the phone. I told him of my plight and read off the numbers that were on the plasma tube. Sure enough, it was one of their early lasers. They have been manufacturing HeNe's since 1963. He provided me with many of the details that I had been searching for.
I finally located a small supply of HeNe gas, just yesterday. While visiting North Country Scientific to purchase a pair of neon sign electrodes (in Pyrex), I mentioned my need for a small amount of laser gas for my laser refurbishing project. (This was formally Henry Prescott's small company that supplied all the hard to find components for the Scientific American laser projects.) Lo and behold, there on a shelf, covered with dust, were a few of the original (1964?) 1.5 liter glass flasks filled with the 7:1 He/Ne gas mix. He let them go at a very decent price!
(Hopefully, those tiny weeny slippery He atoms have not leaked out! --- sam)
Now, about the magnets:
The magnets are of rectangular shape, one inch long, 3/4 inch in width and 3/8 inch thick. There are a total of 26 magnets placed flat against the top (14) and flat against the bottom (12) of the plasma tube as viewed from the side. All but the ones on the very ends of the plasma tube are attached exactly opposite from one another, top and bottom. (See Jodon Laser Head for placement and field orientation).
They are placed with the long side (1") parallel to the plasma tube with the north and south poles along this axis.
They appear to be of ceramic construction and not very powerful. Sorry, I don't have any means of measuring the actual field strength.
The current status of this project is that the laser needs to be regassed. Chris is equipped to do this and has acquired the needed HeNe gas mixture.
To be continued....
Photos of a similar but much larger Jodon HeNe laser (3.39 um IR in this case) can be found in the Laser Equipment Gallery (Version 1.41 or higher) under "Jodon Helium-Neon Lasers".
Prolog:
Date: Thu, 20 Nov 1997.
Hi All,
Sony experts...help!! I'm puzzled! Any hints???
The details:
This is a circa 1990 27" Sony with dual-tuner PIP, "ANU-1" chassis (same basic "guts" as the non-PIP 27XBR10's).
Last weekend I was flippin` channels when the screen just went blank between flips. The set seems to be functioning completely normally..except no picture! Tuner works, sound okay, PIP seems functional, video inputs switch, high-voltage okay, filament lit, remote works, "sleep" lamp is off and I could hear the H & V scan change as the channels changed.
Wrestling the set up on to the bench, I narrowed down the "bottleneck" to the Y/C/J "Jungle" chip.
After convincing myself that the chip was bad, I ordered another one ($30!). To make a short story longer....It did not help.
The suspect was the 48 pin "IC301" (CXA1313S) Jungle chip on the main "A" board. The chip contains the H & V stripper circuits as well as all the digitally adjusted Y/C to RGB conversion and switching circuitry. The RGB outputs of the chip then go directly to the neck board drivers.
There are three video inputs to the chip, the Y/C input, the RGB input for the OSD and another "ext" RGB input for the PIP circuitry. I can see correct tuner/aux video signals at the Y/C input pins, and good OSD and PIP video RGB signals. However, the RGB output pins just show a positive going ~50uSec pulse. No "video" at all.
The problem is that all the usual video "adjustments" are performed by multiple D/A's in the chip. There are no coils or pots to adjust.
The sync sections of IC301 seem to work, as I can see it "lock" as a video signal is applied. All the sync signals are there and look okay. Voltages and waveforms around the Sync and Video *inputs* of the chip are very close to what the manual shows.
The neck board and CRT seems okay, as applying appropriate voltages *directly* to the neck-board inputs results in the expected Red, Green or Blue rasters (with retrace lines). The raster appears at about 3.8V and is full-brightness by about 5.5V. Going too-far trips the X-ray protection (as expected).
The biggest error is the DC level at the chips RGB outputs. The manual claims 3.9VDC. Right now the outputs are 0V with a 3.5V, 50uSec positive going pulse (V-rate). There should be 1.5Vp-p of video signal on these outputs. I am assuming that I should see the video signal between 4 and 5.5V.
The manual claims 2.4V for the "ABL" input, and I measure 2.5V. More discrepancies:
I'm getting the feeling that the chip is being "told" to misbehave.
Help!!!
Date: Sat, 22 Nov 1997 09:30:36 GMT
I want to thank everyone who has responded!!
First off; NO, it is not the regulators. Been there, dunnit months ago.. All supply voltages are "normal" and steady.
Alan Harriman sent me a copy of a previous post from "cyberchaos" about "IK Shutdown". It hit the nail-right-on-the-head. There *is* a reason why the chip would shut off the video!
This is a copy of the earlier post by "cyberchaos@aol.com":
-- begin quote --
"Other than power supply problems, this is the second most common circuit to give people problems on our sets made in the last 5 years. If you have high voltage and vertical deflection (as you indicated) the unit is probably in what we term as 'IK blanking'.-- end quote --The jungle IC sends a 60us pulse in the vertical blanking area in order to monitor CRT cathode current, thus maintaining white balance. Each color drive output has its own pulse in this area (Red=line 17, Green=line 18, and Blue=line 19. These pulses are them matrixed and returned to the jungle IC to be monitored. If one or more of the pulses does not return (or is very low) the jungle IC will keep the video off. Bad video drivers, weak CRT cathodes or faulty IK pulse return circuits will cause this symptom".
Here's how to find the cause: Even though the video is off, the Jungle IC is sending the pulses to the CRT board. Measure each of the cathodes with a scope. At vertical rate you should see a 60us pulse at each cathode about 20-50 volts in amplitude. What we're looking for is one of the cathodes to either have an extremely large pulse (in comparison to the other two) at about 150 Vp-p or having no pulse at all".
If one cathode has no pulse, troubleshoot the driver circuitry for that color.
If one cathode has a very large pulse, the cathode is weak or the return pulse is not making it back to the Jungle IC. To tell if the CRT is bad, turn up the screen control and see if you get a raster with one of the primary colors missing. It should be the color that you saw the large pulse on. If the raster is white or is slightly dominant in one of the primary colors, the CRT is probably OK. Troubleshoot the IK return buffer transistor and associated components for that driver.
If all 3 cathodes have a large pulse (150VPP) Then check the following:
- The IK buffer transistor which is sending the combined pulses out of the CRT board (all three must be present here and at least 700mvpp).
- The screen control is turned too low.
- G1-G2 short or leakage. this will be evident by G2 voltage dropping drastically while the CRT board is mounted on the tube and raising when removed."
It looks like this is what is happening, but it is the result of another odd problem on the neck board.
The green cathode shows a "normal" pulse, but the red and blue show a strange 11 cycle pulse train where the "IK" pulse should be.
Cathode waveforms:
"Good" green cathode:
----+    <- 60uSec ->   +------------- 200V
    |                   |
    |                   |
    |                   |
    |___________________|           ___80V


______________________________________ 0V
The red and blue cathodes show a really "weird" pulse train during their
"IK" interval.
    |-| 5 uS apart, 1 uS wide.

----|-|-|-|-|-|-|-|-|-|-|------------- 200V
    | | | | | | | | | | |
    | | | | | | | | | | |  (11 pulses)
    | | | | | | | | | | |
    | | | | | | | | | | |           ___80V


______________________________________ 0V
The eleven narrow pulses are triangular, stable, 5uSec apart and
1uSec wide. They roughly occupy the same "area" as the "normal"
pulse.
Simplified output stage:
        +200V
          o
          |
          /
          \ 8.2K
          /
          |           B     1K
        A +----|>|----+----/\/\-----o To cathode
          |           |
          +----||-----+
          |  680 pF   |
          |         |/ E
          +---------|    PNP
          |         |\ C
        |/ C          |
 9V o---|    NPN      |
        |\ E        __|__
          |         _\_/_
          |           |
        |/ C          |
  In o--| NPN        E \|  (PNP)
        |\ E            |--o gated 173 V
          |          C /|
          o           |
       to 'I'         o
       source    to protection
                 summing node
                  and buffer
Here is where it gets weirder.... On the driver transistor collector, there is
a "normal" 200-80-200V pulse at point "A". But on the "CRT" side of the diode
(point "B"), the "weird" pulse-train appears. The waveforms remain the same
even if I isolate the CRT cathodes; so it does not seem "load" dependent.
Removing or bridging the 680pF cap makes only a slight difference. The transistors and diodes look "okay" on a curve tracer.
The IK feedback pulses reflect this "pulse train" waveform. The green interval shows a 0.6Vp-p level, but the "pulse train" shoots up to 3.5V. I can also see the amplitudes rise as the load of the scope probe is applied to the cathode.
Here is an example of feedback waveform at the "IK" pin 25
|||||||                         - 3.5V
|||||||
|||||||        | 1.2V "spikes"
|||||||________|_______         _ 0.6V
                       |
                       |
"R"     "G"      "B"    -------  - 0V
I discovered this late last night, so I left it at that, saving the "digging"
for later.
Tonight, I was in the middle of tracking down the cause of the "weird" pulses, when I pulled a "bonehead" stunt. I accidentally clipped the scope ground clip onto the 1000V "G2" line, instead of the ground next to it. This stunt blew the 1000V rectifier diode and flameproof resistor. So until I get some new parts, I'm "SOL" for now. Hopefully I can pick some up replacements tomorrow.
So, Stay tuned! (If your %#@%!# TV works!)
Date: Sun, 30 Nov 1997 01:43:02 GMT
Now that the Holiday Hoopla is over, I had time to take another crack at the set.
I was going nuts trying to track down the source of these funny "pulse trains" in the video circuits. I did not want to call them "oscillations, because the pulses were too regular and did not "vary", as you would expect a feedback-type oscillation to act.
Suspecting "flakey" parts in the neck board, I swapped parts between the "good" channel and the "funny" channels. No difference - no better, no worse. I was stumped!
I then began to suspect the Jungle chip and it's associated parts again. I began swapping/bridging the various components around the chip...again. When I bridged C309, the "AKB-R" capacitor, the strange "pulses" for that channel went away. So I did the same for the other two "AKB" capacitors. When I touched in the last cap, BINGO!, the picture came back on! Yippee!
The three caps (C309,310,311) are 0.1uF film caps hanging off IC301 that are used as integrating capacitors for the "IK" sampling circuit. It seems a little strange that two of the three caps would go "bad", but stranger things have happened!
The removed caps all measure the same on the bridge (C & ESR @ 1kHz). Unfortunately, my "junk" box is out of similar 0.1uF film caps, but I will get some next week. Right now I am using ceramic "bypass" capacitors. I cannot announce "success" quite yet.
So, If you have no video, and see set of thin "pulses" on *any* of the RGB input lines, "IK" line and cathodes, try bridging/replacing C309, C310 and C311.
Hopefully I will be able to button-up this set by next week.
Cheers, Paul Grohe
(Indented text from: Michael Caplan (cy173@freenet.carleton.ca).)
The "current detection" circuit outputs are all summed into one junction, and all three video amplifiers share a common current source. It could be feed through.
However, each color is "pulsed" individually, not at the same time, so the "runt" pulses from one color can't simply feed-through to another....strange.
"Perhaps there is someone more familiar with the SONY IK system who might enlighten us."Please do! Or, does anyone have a datasheet for the Sony CXA1313S "Jungle" chip?
When I did the initial checkout of the jungle chip, I *did* bridge each cap *individually*. Because I was not aware of the function of the "IK" system at the time, I did not know what to watch for! It finally took bridging ALL THREE caps at the SAME TIME to restore normal operation.
More puzzling to me is why the caps went bad at the same time. Any spike big enough to kill the caps should have killed something else! If IC301 was "zorched", the new one should have worked.
Problem: Callers and callies complaining about excessive noise on telephone line.
Diagnosis: Noisy Radio-Shack phone
Possible remedies:
Experience buying another Phone:
Total: $62.50
It's no wonder why you throw it away.
(From: HA11747ANT (ha11747ant@aol.com).)
Patient: AIWA RX-N373U mini stereo receiver.
Symptoms:
When you turn on the power, the receiver comes on and immediately shuts off, blanking the digital display. After about 10 seconds, the display comes back on flashing "12:00 AM" (if clock was set in receiver). When the display comes back on, pressing power will repeatedly do the same thing over again.
The cause:
I found (after about 3 hours of troubleshooting the power supply and microprocessor) found the main power amp module IC203 (STK-4162II) bad. How I found this was not easy. I finally resorted to jumpering the relay's driver transistor (Q108) between the emitter and collector, energizing the relay, which switches on the main power amp's supply rails. The display went black immediately, and did not come back on until 10 seconds after I removed the jumper. While the relay was energized, I went to the speaker outputs and checked for DC offset, low and behold, the left channel was at the full negative supply rail (-39 volts)! The right channel was OK. I haven't put in a new module (I wont be able to do that until Monday), but hopefully that will repair this receiver. If I went to the module itself and disconnected it's speaker outputs from the main board, the receiver would come on normally.
My Comments:
This one was definitely a strange one. I was rather upset (learned more words to my vocabulary which I won't repeat here), after going for 3 hours to find a bad STK module. What kills me is the rather strange protection circuitry used in this receiver, if there's a fault in the power amp, the damn receiver won't even come on properly to reveal the fault. It kind of pi**es me off to see stupid circuitry designs like this. I thought the Pioneer RX-series "blow line" was stupid, but this one takes the cake. In my 25 years of repairs, I've never seen something as retarded as this. I would have to call it an "overdesigned circuit", yet the simple speaker relay protection I've seen in many units would suffice.
(From: Jerry G. (jerryg@total.net).)
Do you think that if the receiver was allowed to stay on, and the speakers were left connected, they would be destroyed? If the STK chip is putting out DC to its output, this is very dangerous for the speakers!
When I troubleshoot these types of units, I never connect the speakers. I use a sample and hold voltmeter. I get a full DC from the supply for a bit less than a hundred milliseconds if the chip is shorted...
Technics has a few receivers that don't have a protection at all for the DC outside of the chip itself. I have had a few cases where the speakers actually caught fire!!! One model that I had a few cases on was the SA 350 series. I have been told it is know for this!
In fact I have one here at the moment that destroyed a pair of expensive Tanoy speakers. The customer went to the manufacturer and got nowhere with them. They didn't want to know about it! She dumped the receiver on me. I fixed it, but I later on will be adding some very large non-polar coupling caps on the output. This will fix the DC problem if the chip blows again!!! Then the receiver should be safe for speakers if the output chip blows again...
Most of the time these chips blow when the user tends to put the volume too high for the rating of the receiver, and there is some distortion. This makes it run too hot, and will eventually break down. Another problems is when the customer goes and buys 4 ohm speakers for a unit that is designed for 8 ohms only. And, the classic problem that causes breakdown is that people sometimes don't connect the speakers properly. Some of the strands may touch each other, or the wires are not on properly.
I'm providing this for anyone else as a few pointers which might help fix a senior VCR :)
Problem #1 -- Tape play would abort in mid stride.
I found that putting it across one of the pots improved the picture to perfect state! Then I tried a 1k resistor, same effect. Soldered it on, works pretty well.
If some one would like to explain why it worked, I'd love to hear why!!
Sh*t happens :-)
Likely a loose wire, broken connector.
This is my mother's VCR, a Quasar VH400.
I took it to Zap-City (true name suppressed) TV and Electronics after it started refusing to load tapes. I was quoted a $25 non refundable diagnosis fee, and was told that given the symptoms the repair would likely run $25 in addition to this fee. A few days later, they call my mother and tell her the repair will be $125.
Since I can buy a new VCR for that, she wasn't going to pay that, but I wasn't going to let Zap-City have the VCR for free so I went and picked the carcass back up. I set it on a shelf when I got back home, and it sat there for a couple of months, and then one day I decided to see if I could diagnose and repair it myself.
I can fix most mechanical VCR problems if I can find the trouble, but this had appeared to be a sensor problem, so I had thought it better to leave the repair to a VCR shop, and chose Zap-City, a factory authorized service center for this Quasar VCR.
I thought the repair quote from Zap-City was obscene, and told the joker there that I believed I was at least entitled to a detailed diagnosis for my $25, and he refused. He made some remark about the trouble being in the tape transport was all.
So two months later, when I hauled it out to take another look at it, I suspected I might have made an error in my assessment of the problem being a sensor problem, and I decided to examine the tape transport.
I was thinking I would find a stripped or broken gear somewhere, since the joker at Zap-City had said the problem was in the transport. I figured I could find the problem gear and make a new one with fine sand casting and curable clear plastic epoxy.
The only way I found to move the tape transport from full disengage to full engage was to turn a worm gear by hand. It took 72 turns, which was a pain in the butt. This is one reason I gave up so easy the first time.
Then it hits me, I can hook up a big 6 volt flashlight battery to the tape transport motor, and use that to drive it back and forth so I could do a full gear inspection. Worked pretty well, too. I removed the entire transport and ran it back and forth about 50 times, looking for the problem gear. But all the gears appeared to be working perfectly.
Then I noticed it.... There is a little return spring that carries the tape to the sound head, and it had been bent, (The VCR started acting up immediately after it ate a tape.)
All I had to do was to remove this spring, use a needle nose pliers to bend it to give it more tension. I reassembled the unit, and it has been working perfectly ever since.
Damn, Zap-City wanted $125 to replace a bent return spring, I guess they think their time and 'expertise' are far more valuable then the rest of you normal people's...
Anyway, since I got it back, when it records the sound on playback is really low, pretty near inaudible when an older used tape is used for he recording.
Prerecorded tapes and tapes it made earlier play back at normal volume. The picture and tracking are perfect, and I aligned and centered the sound head.
I notice there is a resistor to the right of the tape transport which has obviously been overheated, to the point where I cannot read the value to be able to replace it. Could this be the problem component? At any rate, I would appreciate it if someone could tell me the value of this resistor, and/or give me any input on what the problem might be.
I would also appreciate it if someone who knows Matsushita's email address would give it to me. I would like to narc on Rite-Way, but I can't find any email links on Matsushita's worthless Web pages.
(From: sam) In all fairness, Zap-City, like you, probably didn't have any idea what the problem was when they issued the quote. They just knew that it wasn't obvious and thus they didn't want to deal with it!
A friend gave me a nice VCR.
It had a fried SMPS. I spent $15 on a kit from SK. It didn't have the 82 uF cap which of course had blown its top! I finally got it working even though the test instructions were erroneous.
Fired it up and the video head bearing is really noisy. I went to a bearing house figuring $10 at most. Nooooo! "Yes, we have them at our Tracy, CA warehouse at $38 each", he mumbled something about precision bearings. I said I didn't think the VCR maker had paid that much. They checked some more and said they could get them out of Atlanta, GA for only $7.81 ea plus shipping and gouging. I said thanks and left. I then tore apart a swap meet machine I paid $10 for and lo and behold same bearings. I gently removed them and then installed them in the other machine. No more picture!
Read FAQ (should have before!) I didn't mark position of motor.
Lots of tweaking, finally got it back. Whew! I guess it was worth it....
Here's one that should be right up your alley, if you can get past my lousy description of the problem. A girl I know wanted me to fix her combination TV/VCR, which had eaten her tape. I agreed, somewhat reluctantly, to open the case. So we managed to get the VCR out (score one for Zenith -- they made the board with the VCR assembly easily removable; whether this is good engineering or cynicism I'm not sure :) and looked at it.
Oh yeah, the symptoms: When plugged in, the machine would power up (sometimes without even needing to be switched on!) for a short time, maybe a few seconds, then turn itself off. The VCR made a rather unhappy sound during that time, as though it were trying to eject the tape. The tape was quite mangled; the heads were away from it and the tape door was closed, but the tape had gotten caught in the door and crumpled.
Secondary goal: fix the VCR. Primary goal: get the _____ tape out :)
Back to the story... So the only thing about the VCR assembly that didn't look fine, aside from the unspeakably cheap Third World construction (one metal piece was attached with TAPE!) was a capacitor. Around the base of this capacitor was some hard white stuff. It looked like it might have come out of the capacitor, although given the general care that went into assembling the VCR I thought it could have been insulation. What do you think? This capacitor was in the general region of the power supply, BTW.
Now, to vent for a moment: This TV reached the ripe old age of 2 years before dying. When we opened the case, there were already 2 pieces free inside it: an anonymous piece of clear plastic, and some sort of little metal piece that had liberated itself from some mechanism. The person across the hall from this girl has a VCR, also two years old, that has stopped recording. I have a Sony tape deck that I've had for a couple years, and one of the two tape bays doesn't work.
We also have a Panasonic VCR circa 1980 that still works fine (no repairs in its 18 years, except one lamp that burns out every few years -- which is user replaceable with a soldering iron), a BiC tape deck from before I was born that works better today than my Sony did when it was *new*, and so on...
From sam:
The white stuff may just be adhesive especially if >it is dry and hard. Though, that glue (when it turns brown) is known to >short stuff out! The little prism thing may be THE problem - part of the tape-in sensor or one of the end sensors. Figure out where it goes and at least some of the VCR problems may be solved. I am waiting for the next installment.....
Please help!
Problem: Broken VCR circuit board from shock of computer monitor landing on top of VCR while moving electronics in car during rush-hour traffic (sudden stop.) Plus, it is my friends $1400 VCR that I broke. Circuit board broke into 2 pieces. Copper tracers(?) broke. Need to reconnect tracers.
Status: I have etched away all the green stuff, and epoxied the 2 halves together.
Solutions: The only things I have found so far to fix it are "Pretinned solid bus wire", 24-gauge, $1.79 from Radio Shack, or a "Etch your own PC board" kit, $13.99, from Radio Shack also.
Available tools: Radio Shack solder gun, wire strippers, and about $50.
Questions:
The VCR is fully functioning again--well almost. The only thing not working is the channel up and down front panel control and also the channel up and down controls through the remote. However, channels can still be selected directly by using the remote to input it, such as "11." Usually the best way anyway. I figure it is just a lose connection somewhere else on another board, but I didn't see anything.
The procedure used in repairing the VCR:
First, the broken circuit board was epoxied together, which ended up looking like it had never been broken. I made sure that when i epoxied it together, that i could still see the traces well. Next came the long, tedious part. In all, i had to make about 25 broken trace jumps. I used #30 wire-wrap from Radio Shack, 0.022 silver bearing solder, Rosin Soldering Paste Flux, and a 15 W solder iron. I probably should have used a magnifying glass too, but didn't have enought money to get one. I just followed the broken traces back on each side of the break to the closest soldered pin (please note i don't know the proper technical definitions) and placed a very small dab of Flux on the point with the end of a paper clip. In most cases, i just re-heated the old solder and placed the wire-wrap end into that, so i hardly used any of the solder i had purchased. This was mainly due to the fact that the pins were so close together that i didn't want to risk shorting anything. Finally, to add strength to the epoxied joint, i cut up one of my old credit cards, and epoxied a small piece to each side of the board.
When i was finished, it kind of looked messy with all the wires, (25 of them or so) going in various directions over the circuit board. I tried to flatten them out as good as possible and then applied some electrical tape over a couple locations to help hold the wire in place. I wouldn't call it a work of art, but at least the VCR is working again. I noticed that the point where the break occurred also had a small plastic support going from the front panel display to the circuit board. I had to break this off (well, i tried to shorten it but is broke) because that was the same place the credit card support was added. I figured that was also a cause for the break in the first place--over 10 years of use, this location probably became weak whenever someone pressed the eject button. And there is no eject button on the remote, so this probably had caused small stress fractures in this area, which eventually broke when the 17" computer monitor landed on it in the car.
All in all, I probably spent 12-15 hours to get to this point. It turned out to be a good decision for me to repair it because it would have cost anywhere from $600-$1500 to replace it (it was a top-end Hitachi from 1988, with digital effects, Picture-in-Picture, S-VHS, Hi-Fi, Level control, and many other hard to find features that most current VCRs don't have.) Not to mention that I probably would have just been playing Jedi Knight with that time anyway. So it was a good learning experience. My friend has his VCR back and is satisfied with its condition, although i would like to get the channel up/down buttons working for him. Boy, am I lucky (or unlucky for breaking it in the first place.) Wish me luck in Saturday's $110,000,000 Powerball.....
A while ago I was presented with a mini battery-powered scope, an irresistible toy by any accounts. 'For the engineer who has everything'...
Made by a British firm in the Seventies, it had dual traces and 20 MHz bandwidth. The whole thing ran off six 'D' size nickel-cadmium batteries. It had a cute 4" screen and was about 9" by 14" deep by 5" tall. Like most British instruments of that era, all the transistors were in sockets!
The previous owner was a scrounger like myself, and he had given up on it as a bad job. But it was such a dinky piece of equipment it might as well have worn a T-shirt saying 'Please Fix Me.' I made up my mind to do whatever it would take to get the thing working. I didn't know it, but I was in for an epic battle!
Before getting stuck in I inspected the service manual. (Yes, it came with a service manual.) On one of the schematics pages, a large arrow had been drawn on the EHT tripler, with the helpful legend 'Burning here!' Further down the margin was a note; 'Replacement EHT unit costs 75 pounds!' Uh-oh! (US readers; 1 pound = about 1.5 dollars)
Opening the scope, I was greeted with a grisly sight. A square inch of insulation on the EHT multiplier had turned into brown bubbly crust, and black streaks were burnt along the EHT lead. Out of a sense of morbid curiosity I attached a bench power supply to the battery terminals and applied power. A miniature lightning storm broke loose inside the scope and the current meter shot up to a silly number of amps. Horrified, I pulled the plug.
This proved that the power supply was healthy, so I decided to continue. I unscrewed the multiplier unit, a potting-resin brick with flying leads, and dangled it as far away from conducting objects as its leads would allow. Then I repeated the experiment.
This time, apart from a bit of crackling as the EHT built up, nothing nasty happened. Actually, nothing happened at all. The thing was obviously live though; the heater was glowing and the multiplier was sizzling away nicely. I turned brightness up as far as it would go; nothing. Consulting the manual, I tweaked the sub-brightness and blanking trimmers on the tube base board. Bingo! A trace! Unfortunately though, it didn't blank during flyback. Nevertheless I was able to verify that the Y amps and timebase were working. Things were looking better by the minute. For the present though, something needed to be done about that EHT unit.
As far as I could tell, the components inside it all seemed to be working. So I decided to repair the insulation. I had vaguely heard of a substance called 'conformal coating', a clear rubbery resin that would withstand high voltages. Perfect! Unfortunately I didn't have any. With the impatience of youth I ransacked the chemical cupboard until I came across a tube of the clear, rubbery sneaker repair compound, Free Sole. Yes! Free Sole looks just like conformal coating, I reasoned, so it must be able to withstand high voltages! Oblivious to the flaw in this logic I applied a generous coating of Free Sole to the destroyed insulation. As I waited for it to cure I pondered how I could check its insulating properties. Maybe if I plugged my brother's hiking boots into a socket...
Next day I re-assembled the scope. The Free Sole had developed a lot of air bubbles and it didn't look good. Would it hold up when the 8,000 volts kicked in? I threw the switch. For a few seconds there was silence. Then a vicious crackling developed. Bummer! I must have got a bad tube of Free Sole. Still it was better than before; the power supply wasn't actually being overloaded. Seizing a roll of electrical tape I wrapped the EHT unit until it was mummified. I still wasn't too confident, but I had heard that oil was a really good insulator. I couldn't fill the scope full of oil, but grease! That would do the trick. Applying a generous coating of Carlube around the damaged area I screwed the EHT unit back in, and the crackling eased off to the occasional tiny click.
Now the EHT was working I could mend the blanking. Using another scope I found that the blanking signal went into a transistor buffer stage... but never came out. The transistor was obviously history. It was near the EHT unit, so it was probably zapped to death. I didn't have an exact equivalent, so I replaced it with a 2N2222. (The service manual mentioned 'high frequency'.) Now the trace unblanked, but only at the beginning of the sweep. Afterwards it faded out.
The blanking was dealt with on the tube base in two ways; a small capacitor fed the start of the unblanking pulse straight to the grid, while the rest of the pulse went down a resistor chain and was amplified up again. This complex coupling was necessary because most of the tube base circuitry sat at an impressive -1,600 volts relative to chassis. Yikes! How would I troubleshoot that? My multimeter could only stand 1,000 volts. But - the display went up to 1,999. Surely, I thought, 1,000 V would be a worst-case value, and the 'average' multimeter could take more. In any case I'd be careful not to apply the test leads to any points more than 1,000 V apart. Suddenly one of my probes slipped... and for a split second the meter showed 1,720 V. Then there was a bit of a bang. Not bad though, the last one exploded at only 750 V when I was working on some tube equipment. From then on I resolved to work on the tube base only when unpowered. (The moral of this is - not all battery-powered equipment is safe to work on!)
Eventually I tracked down the fault to two 0.1% resistors on the tube base which had failed open-circuit. It was the first time I had ever seen that. In a bizarre coincidence, the dead digital multimeter contained exactly the right values of resistor to replace them. They weren't 0.1% but so what, I figured. (I would regret this later.)
Now the scope was ready to go into service. It worked fine for a few days, and then suddenly it began to crackle and the screen flashed. The scumbag had already cost me one multimeter! I gave it a few ill-tempered bashes with Mr. Fist but to no avail. Then the trace disappeared completely.
Opening it revealed that a little piece of metal filings had got into the tube base. Sitting on the chassis, its pointy end stuck out towards the circuit board. This created a lovely spark gap. I only noticed this because it lit up! The transient voltages caused by the sparking had obviously fried something. In disgust I hurled it to the darkest corner of my junk pit.
2 years passed, and I finished university. I now had an honours degree in electrical and mechanical engineering! 'That' oscilloscope would not defy me now!
Before I started I made a x100 high-voltage probe for my latest multimeter. Foolishly I used 10M 10% carbon resistors which are non-linear at high voltages. I also modified a scope probe by taping a 4n7 5 kV ceramic capacitor to the end. I then investigated the tube base again.
After a few evenings of exploration I tracked the problem down to the most expensive component on the board... a high voltage, low-power FET. It didn't appear in any of the data books, and with its white ceramic case and gold pins it looked like an antique. The manual said that it 'formed a long-tailed pair with the CRT to regulate supply current' - great. Since the characteristics of a MOSFET and a CRT couldn't possibly match anyway, I wouldn't have to worry about finding the exact equivalent. Picking a device with suitably high breakdown voltage and low leakage I hurtled to my local electronics store.
Back in the workshop I bent the thing into a pretzel shape to get the Gate, Drain and Source leads in the right holes. After a bit of adjustment the blanking worked perfectly. Now, I had to deal with that monstrous collation of Free Sole, electrical tape, grease, and burnt plastic. I ripped it out and took it down to the basement. With a PCB drill and a burr, I machined off all the Free Sole and burnt potting resin. I kept on drilling the resin away until I came across the internal connection for the EHT lead. Then I cut off the lead, chopped out the burnt bit, and soldered it back on. To help it out I stuck a piece of 10,000 volt GTO sleeving (I think it stands for 'Gas Tube, Outdoor') over the lead. I then made a cardboard-and tape pot for it and potted it up again. It looked as good as new!
Firing it up again I was greeted by more sparking, and a flickering screen. My potting job was bombproof, so I suspected something else. Turning all the lights out, I peered into the guts. Now this scope had an unusual EHT lead arrangement. Instead of the single captive length of cable ending in a big sucker, it had a cable attached to the EHT unit and another cable coming from the tube. The leads joined in a plastic connector - and blue flashes were coming from deep within! Gotcha! I switched off and, opening the connector, I stuck a screwdriver in to discharge the EHT. Blam! Yikes! Being the suspicious type I waited a minute and did it again. Blam! Yikes! That's dielectric memory for you. The EHT lead to the tube had come adrift inside the connector, and the tube current was having to jump the gap. Soldering it back on I fired up again.
Now a sinister frying noise came from the innards. Apart from this, the scope was fine, but I didn't like it... the noise reminded me of that scene from 'The Taking of Pelham 123' where the bad guy steps on the third rail. By just waving a scope probe near the guts I could pick up spikes of interference from the discharge. Using this method I tracked it down to that plastic connector again. I cut it out, soldered the leads together and ran them through a thick plastic tube which I zip-tied in place. Silence!
The scope is still running, and I now use it as my main oscilloscope. Sometimes when it gets hot the blanking won't work, because of those resistors I put in that weren't 0.1% - but so what. I still love to play with electronics. To save you some hassle, here are the lessons I learnt;
I was given this monitor by a friend. It was a good one, would support 1024x768 which was a far cry from the plain vanilla VGA monitor I was using on my CDROM burner. (It was an old Compaq that was salvaged from a dumpster. A $2 video output IC had fixed it.) When turned on, with no video input, the MGC made a loud noise, kind of a hiss or crackling sound, like frying bacom, coming from the Switchmode Power Supply transformer. The display was also unstable unless the brightness was fully on. If I plugged it into the video port on my notebook, it would quiet down. It was also quiet when plugged into the video card in my CDROM burner, but only if the brightness controls were set as high as possible, and if a light background was on the screen. Bring up a darker page, or lower the brightness, and the hissing noise would reappear and the display would jiggle and show noise in the horizontal.
I suspected a problem in the Switchmode Power Supply, but they can be rather complicated and difficult to track down without a schematic. I subscribe to Electronics Now, and Sam had included a schematic from a "no-name" monitor in an article on the SM power supply. I examined the schematic, and my monitor, and as luck would have it, they were identical!
I took some oscilloscope readings, and with video present, and all signals appeared normal. With no video, there was evidence of ringing (oscillation) in the positive half of the waveform on the drain of the power MOSFET. I checked all the capacitors and diodes in that section of the board, but everything was fine. Next I put the scope on the gate of the MOSFET. With no video, the gate drive signal went crazy. I knew the Pulse Width Modulator IC was okay, because the monitor worked. The DC output voltages were okay when there was video signal, but with no video signal, they increased. The B+ would go from +92 V to +133 V.
I removed each of the electrolytics on the secondary side of the SMPS transformer. All the ones in the higher voltage sections were fine, but when I got to the 6.3 V line, one of the two 470 uF electrolytics, the one nearest the diode rectifier, was bad. Looking at the schematic, I could see what happened.
There is an opto-isolator used to control the Pulse Width Modulator top regulate the output voltages. The DC supply for the LED in it comes from the 6.3V line. Since one of the capacitors was open, some 45 kHz AC ripple was present on the LED. This "signal" was passed through the opto-isolator to the PWM, which in turn amplified it and fed it to the gate of the MOSFET. The MOSFET generated noise in the transformer, which passed even more of it to the 6.3V line, eventually making its way back to the PWM until the SMPS transformer was nearly saturated. I replaced the bad 470 uF capacitor and the monitor works perfectly again.
A friend of mine, who lives on a small boat, noticed the new owner of the boat next to his putting boxes of "junk" on the dock. He struck up a conversation and was told the "junk" was on its way to the dumpster. My friend asked if he could have it for me, since he knew I like to repair electronic equipment, or scrap it for parts. There was no objection, so he showed up at my door with a large, wet cardboard box. Inside was an RCA VCR that didn't work. It was a fairly expensive one, where half of it slid out and could be powered by a battery pack for use with a camera as a camcorder. Somebody had spilled varnish on it and the buttons were stuck on the front panel. I took it all apart, cleaned it up, replaced one drive belt, and it worked.
In the bottom of the cardboard box was a rectangular box made from metal. It was brown and disgusting looking, and was wet from being left out in the rain. I didn't know what it was, but noticed an embossed area near the bottom that said "IBM" followed by a number. I examined it and noticed a handle on one end. There were two small buttons on the sides near the handle end, so I pushed them and the front section of the case lifted up to expose an LCD display, two 3.5" floppy disk drives, and a keyboard! It said "IBM PC Convertible." It was a notebook computer!
It was in sad shape, and I poured seven ounces of water out of it. Most people would have given up at that point, but I wanted to see if I could fix it. It took a few minutes to figure out how to take it apart. The battery pack was no good, but was composed of 8 nicad "C" cells, so I knew I could rebuild it if necessary. The keyboard lifted out, and I could unplug the ribbon cable. The LCD panel lifted out of a socket. Two screws held each of the disk drives in place, so I removed them and pulled the drives out. Once they were free, I was able to lift the rear portion of the case to expose the motherboard and three smaller cards. I unplugged the boards, then removed the stiff paper insulator under them. I dried the keyboard, circuit boards, disk drives and case with a heat gun. One of the drives was frozen, so figuring I had nothing to lose, I squirted some WD-40 in it and worked the motor back and forth by hand until it loosened up. When everything was dry, I put it all back in the case and plugged in the display.
There was an IBM power supply in the cardboard box. It was wet, but looked okay. It plugged into a socket on one side of the computer case. I noticed a red button next to it and pushed it, but it didn't make any noise so didn't think anything happened, until I looked at the LCD display. There was a drawing of the computer showing a floppy disk moving toward the left hand drive! It worked! It was waiting for me to put in a disk with the operating system!
The next step was to make a boot disk for it. Since the CPU was an 80C88, I knew the drive would have to be only 720K. Luckily my main computer at that time was a 486-100 running DOS 6.22 and Windows for Workgroups 3.112E I had a few spare low density floppy disks, so I made a boot disk with 6.22 to try it. The notebook booted right up, no problem. Knowing that the kernel for 6.22 is larger than DOS 3.3, I dragged out an old 5.25" floppy with the older OS on it. I popped in the boot disk with 6.22 on it and turned off the attributes for the three boot files. Then, I copied the three boot files from the 5.25" disk to the 3.5" floppy. Finally, I ran Norton Speedisk on the 3.5" floppy to remove any blank spaces between the files. Put the 3.5" disk into the notebook and it booted up perfectly in DOS 3.3. (This little trick for creating boot disks comes in handy sometimes.) Once I knew it worked, I made a few disk copies and set them aside, then went to work finding software that would run on it. It could not handle much in the way of graphics, but I did find a word processor, some utilities, modem program, database, spreadsheet, etc., that would run from dual floppies.
Since the notebook worked, I invested $20 in some surplus nicad C-cells and rebuilt the battery pack. It would run for 30-45 minutes on a full charge. The keyboard was filthy, so I pulled all the keycaps off and washed them. The mechanical keyboard switches were okay, so I didn't have to remove and clean them. The case was filthy from years of diesel fumes and cigarette smoke, but "409" cleaner, some Q-Tips and a lot of soft rags did a nice job. When I finished it, the case looked almost new. It was hard to believe it even worked, given the condition it was in when I got it. It even had a port adapter and a video adapter, plus a small printer, that snapped onto the back of the computer. I even got a 9" monitor with it, but it was DOA. The printer was no good, all rusty inside and not repairable. The video adapter didn't work either, but the port adapter did. I was able to print with no problem, and the modem port worked with my old ISP, using text mode, so I could use it for e-mail if I needed to. It is only an 8088, so it is really slow, but it works, and makes a neat conversation piece.
Re: Repair Brief 97 (See: Sam's Repair Briefs.) I've got you beat!
How about a 1 week repair time to locate the same bad capacitor in a Panasonic PV-4700. After reading your account, just for the pure entertainment value, and studying your reverse-engineered schematic, I thought "this sure sounds familiar" and went back to the bench to review my reverse-engineered schematic, and check the two filter caps on the 5-V (measuring 3.9 V) output. As I had done previously, I applied the LCR meter (B+K digital) across each one and, as previously, measured about 700 uF. Great, I thought. Each cap is 330 uF, and they're in parallel (except for L3, the horizontal element of the pi filter--like a short, right?--in between) so that's about right, if they're both a little high, I thought. Then, for the heck of it, I unsoldered one lead of C16 and found it was low (under 300 uF) and had a high dissipation factor. I next did the same on C15 and found it was completely open! Replaced them and the regulation came back and the VCR ran. Apparently, that inductor drives the LCR meter nuts. I'm guessing it works by measuring reactance, and the inductor had plenty of that.
I had scoped the outputs, but that didn't help me, for some reason. What I saw there was the 5-V output going up all the way to +5 V for a second, at which point the colon on the display would give one blink and one of the motors would whirr, then the 5 would drop down to 3.9 and everything would go dark until you unplug and repeat. The switcher would continue to switch, but the voltages were off, so it was a problem of regulation.
No blown zeners, but a $24 SAMS VCR facts on the way...(VCR-256) If you ever need to borrow it, let me know. When it arrives, I'm going to see what's inside IC2. Unlike the model you sketched out, this one has one of those stick-of-gum type modules between the regulated output voltages and the opto-coupler. But there's inputs to it from both sides of the above pi filter, for some reason. So the filtering must be critical to the regulation, although, again, I didn't see any obvious ripple or hash on the 3.9-V output, although I didn't switch over to AC coupling and crank up the scope sensitivity to look for anything. (I will next time.)
I found two other crappy caps on the hot side and changed them earlier. I'll probably do the kit and change them all, or the @#$% thing will be back in a month.
One of my best friends in the world brought over his kids' CD player the other day. A 1990 Pioneer, model PDM630. I gently explained to him that he could get a new one cheap and I'd even go in halves on it and make it an early Christmas gift or something. The only problem was, his kids had given it to him and told him to: "Take it to Uncle Jay. He can fix it, he can fix anything!". I don't know where they got that idea. All I have ever done, was fix their Tvs, Nintendos, VCRs, satellite receiver, hot water heater, pool pump..... Anyway, now I was under the gun.
I put a disk in the single cartridge, upside down, but I caught it. :) The machine loaded the disk, waited a couple of seconds, and unloaded it. Pulled the cover off, looked for obvious problems, didn't see any. Put the disk in again, it loaded, the carriage moved down, but the disk did not spin! AHA!.
Along about then, I remembered the S.E.R FAQ and started digging. I downloaded the entire CD Repair FAQ.
I skimmed the text, found the Pioneer Test Mode part. Great! I entered test mode, loaded the disk, turned on the spindle, ran great. Ok, now we are getting somewhere. Must be a bad switch not telling the machine that the disk is loaded. Nope, all switches check out good. I check a few other things, finally sit back to think about it for a while. Figured I would clean the lens while I was thinking. Removed the four shoulder screws from the rubber grommets, and laid the assembly back.
Looked carefully for the lens. And looked and looked and looked. Finally realized that that round hole in the plastic behind which I could see the "speaker voice coils " was the hole that the lens was supposed to be in.
On the plus side, I can look down through the hole, and see the mirror real well. :)
There's no sign of the lens in the machine, of course, so I'm heading to the Pioneer site to get a number to order a new assembly.
It'll probably cost me more than a new machine, but by God, Uncle Jay will come through again!!
I have been reading some of the electronic horror stories at your Website and got inspired to relate a few of my own. You could say that I'm a junior technician, being only 18, as a point of interest.
In short, I fixed a TV with a RAKE HANDLE while simultaneously breaking the all time record for shortest TV repair (arguably).
I found a complete Macintosh Performa 631CD in the garbage, including monitor, keyboard, CDROM, etc (no mouse). Just one problem: The entire thing was full of cat pee! :^() Was I going to let that stop me? Hell no! I know macs suck, but I needed the practice, being a computer technician. Besides, I had a little theory to prove: You can wash a mainboard in soap and water and the thing will still work, as long as you let it dry thoughly. Did it work when I was done? Stay tuned to find out. So, I commenced the dirty deed, making sure to wash my hands !VERY! !WELL! before meals. I started on the case top and all that (you know, those macs are a real pain to take apart). The plastic parts came out smelling like roses, but the metal parts had started to corrode from the action of uric acid. After tedious scrubbing, they came out reasonably clean. The disk drives were pretty much shielded from the cat's vile spray, but the mother board took a direct hit to the processor via the cooling fan. Those Apple engineers put the blasted thing right on top and the cat's aim was true. After removing the mother board, I discovered a puddle in the bottom (I hope you haven't just ate lunch :o ). The power supply's heat sink was sitting right in it. Yet another qualm about the mac design: the power supply isn't a separate module like in the ATs. Anyway, to make a long story longer, I carefully washed the heatsink in soap and water, being careful not to wet any transformers or coils that will probably retain the water and short out - why take a chance, they weren't peed on anyway, fortunately.
As for the cooling fan, I basically just drenched it in water numerous times - this is one of the parts that took a direct hit, remember - to make sure and rinse out any pee residue. Okay, okay, on to the good part: mainboard. I pryed out the processor with a screwdriver as there was no zif socket (mac strikes again). I washed the processor twice with soap and water without a care, knowing all processors are hermetically sealed. I then ran the mainboard under a stream of hot running water for about a half hour and soaped it up several times, making sure to get all the little crevices - there are a lot of little crevices. I then let it tumble dry overnight in the clothes dryer (just kidding about the dryer part). The next day (yes, the whole ididerod took two days), I took apart the monitor, which wasn't too bad, and washed the outer shell. I don't know what i'd have done if the monitor board was full of pee. After letting it dry, I commenced reassembling the whole mess (it was quite a mess, it took up the whole bathroom and part of the living room (those darn macs have so many odd parts crammed in there - that's why they're so heavy)). - another big section cut out here - After it was together and after hooking everything up and finding the power switch, yet another annoying thing about macs, it's in the back and feels just like a nearby piece of plastic so you end up pushing on a useless piece of plastic every time you try to turn the thing on, UGH!, I finally arrived at the moment of truth. With its famous elevator music type of startup sound, it came on!!! :-) :-) :-) :-) :-) :-). That is the first and last time that I was happy to see that insidious smilyface icon staring back at me from out of the deralict void (gosh I feel dirty:-). So, to sum up, you can actually wash a computer with soap and water, when you know what you're doing. If anyone else out there has done this before, I have $20 waiting for them.
Patient: Emerson VCR model VCR3002A, American system. A friend of mind said he was going to dump the machine and I asked if I can have it.
Background Information: Here in our country, Tonga, (in the South Pacific) our main electricity is 240 VAC, 50 Hz just like New Zealand, Australia, etc. Since there are so many Tongan people in the States they tend to send electronic equipment such as TVs, VCRs, Hifis, and many many more. The bad thing is that they have to be used with a stepdown transformer since USA only uses 110 VAC. This is one of the major causes of equipment failure here in our country is that sometimes people forgot to use the transformer!
Fault Symptom: My friend told me that his wife accidentally plug in the VCR straight to the 240 VAC and smoke coming out from the back of the VCR. The VCR is completely dead.
Testing: Plug in to the mains using step down transformer but completely dead.
I removed the top cover and found the fuse has blown. One leg of the rectifier has been burned. I checked the power transistor with my DMM and confirmed there is permanent short between B-C-E. I also check for open fusable resistors but none of them were bad. Off to the electronic shop and buy one rectifier type S6056 (cost $3.00 = US$1.74) same type as the burned one, a power transistor type (cost $5.00 = US$2.91). I connected up these two components and ready to test. Plug in mains with the top cover off and still the VCR completely dead. Expect for any smoke but none. Turn power off and check the fuse is not blown so as to the rectifier. I measured the power transistor while it is still connected in the circuit board and I come up with something strange. The B-E is shorted. I remove the power transistor out of the circuit and measured again. I found B-E is no longer shorted (high resistance). Now I am confuse If this is normal or not. I emailed Sam and asked for his assistance. He replied with some helpful information saying that normally testing the power transistor in-circuit on VCR SHOULD NOT be shorted. Now I suspected a component in the vicinity of the power transistor is shorted that causes the B-E shorted. I measured a small transistor which drives the base of the power transistor but confirmed to be OK. I finally found out a zener diode just around the power transistor which was shorted. I removed the Zener diode and test and still confirmed to be shorted. While the zener Diode is still out of the circuit board, I checked again the B-E of the power transistor and confirmed now is no longer short. This brings me good luck on this problem. I replaced the Zener diode with an identical one and now ready to test again. Hold my breath, cross my fingers, turn the power on and bingo!! The VCR comes alive.
I connected the VCR to a TV and loaded a tape. Everything was just fine except some adjustments on the audio head and the cleaning of the video head. Now I have a working VCR!
Comments: This is a great experience for me to come across such kind of problem. As I mentioned before this kind of problem is usually happen here in our country due to voltage difference but I am more confident if I meet this kind of problem again.
Patient: Mag MX17 in good physical condition.
I am experienced in electronics and repair, but never TVs, monitors etc. I had been away from it for a year or two and got back in with this beautiful monitor. It had been lying round for 2 years because I didn't have a chance to look at properly.
Symptoms:
It lit up its LCD dislay, said no signal, and after 5 secs powered down.
So, first thing to examine was the power supply. I found no -7V. So, I traced the circuit board traces and found an open resistor. Then put a meter on where the -7 V went to and ground and found a short. Further tracing located a shorted transistor, a 2SD799 (Q506) main board.
I replaced it and powered the beast back up. Still the same symptoms. I removed the PS from unit and metered output voltages. Mistake 1: The PS should have been loaded by a light bulb or something. With a light bulb load, the PS was indeed power cycling. This eliminated a short on the main board or something (well mostly). Metered again (Mistake 2: Used a highly inaccurate DMM which read +210V for a +185V source). So, I thought the voltages were very high.
After taking a lot of advice from Bill (MANY THANKS!), I was told to check the 91K resistor in the PS. It was open. Replaced and metered again. Voltage still high. My crap meter! Anyway, days later I dug out my trusty AVO 8 meter, and it gave ACCURATE readings that showed the PS all okay!!
So I put it back together and all I got was a very bright vertical line in middle of screen. Consulted the FAQ (thanks Sam!! big time) and discovered this was due to the horizontal deflection not working. I traced the yokes back from the tube and found a blown transistor, 2SD4924 (Q503). Bill also enlightened me on this and told me to check R514 on the main board as well. Surprise, it was open open! Replaced this and the transistor and checked the other power transistors, and all common faults for this unit. Found Q909 short as well (2SD799) and replaced. Bill many thanks for pointing me at that resistor. Saved me days of heartache.
I reassembled the unit and powered on. Just a very bright white screen. (Well, that's progress, first nothing, then a line, now a white screen. :) --- Sam) At this point it is worth mentioning that this unit had been in for an estimate of repair years earlier, (not by me) and someone else had been inside. So, I turned down main brightness of flyback transformer, and got a picture (not much of one but one). Check all PS voltage again and correct.
It took hours to discover the correct location of about 5 plugs in the unit which the previous tech had put back in the wrong places, and 2 I couldn't remember. When the brightness was turned up, the unit clicked a relay and then said no signal. This turned out to be the brightness was connected to the place for the input selector switch. Then the convergence was messed up, and a lot of other stuff. Eventually figured out the correct connections (I don't have a service manual for this beast) through, logic and common sense.
Then I got a picture. But I had to go and realign every POT on the beast to get the picture right (focus, pincushion, convergence, position, brightness the whole bloody lot).
Now she runs beautifully with one exception: A line was burnt in the middle of the tube, where the horizontal had failed. I only had the unit on for max 10 secs at a time when it was like this (and then only 3 or 4 times), so I conclude it wasn't me. Apart from that I am the happiest man alive ! Successful repair, and I learned a bucket load.
Some recommendations based on my experience:
Patient: GE (Samsung) JES633WN microwave oven with worn keypad.
I just finished replacing my 1995 GE (Samsung) JES633WN microwave oven's keypad. It works now and it didn't cost anything to fix. It did take a few hours, however.
The problem was that the keypad had developed some open traces from rubbing plus water damage. I tried to fix them with Tech-Spray conductive ink and overcoat, but the overcoat ate through the original silver and rendered it unfixable.
So, I called GE to ask the price of a new keypad. $99 including shipping, one week delivery. Ouch. I politely told them where they could put their $3 Mylar keypad with a $96 markup.
Then I got to work replacing the keypad with my own version that's repairable and looks (and works) just like the original. I used a bunch of those low-cost 6 mm square tact switches like you find behind VCR front panel buttons. These were in my junk drawer from 1993, so they were free.
The Samsung model has the PC board mounted a good 3/4" behind the keypad, leaving lots of room to add a thicker keyboard mechanism. I'm glad for that space, as it allowed me to install a piece of perfboard to hold the tact switches. This perfboard is mounted behind the keypad's plastic bezel, spaced from it with 4-40 nuts on the mounting screws that I added. This gives the right switch depth with standard flat-button tact switches.
The first job was to drill holes in the plastic front bezel for the switches. I had already peeled off and separated the halves of the original keypad in my repair attempt. Using the inside piece of the membrane keypad as a guide, I drilled a 7/16" hole in the center of each switch position with a Unibit.
Then I cut a piece of perfboard to size of the keypad and cut away the necessary bits to allow it to fit around the PC board screw bosses. I also cut down the gussets on the screw bosses to make the job go faster. Once the perfboard fit, I installed the tact switches into the perfboard hole grid to fit in the 7/16" bezel holes. Some switches were rotated relative to the others to get the best centering in the big holes (the switch pin pattern is 0.2" x 0.3".)
Next I held the perfboard behind the bezel and drilled a couple #4 mounting holes at top and bottom of the array. I put 4-40x3/8" flathead screws and nuts in these holes to hold the perfboard to the bezel while drilling the other mounting holes. I used a total of ten mounting holes, countersunk into the bezel for the screw heads.
The correct spacing of the tact switches has the tops of their buttons flush with the top surface of the bezel where the touchpad cover sheet goes. If they stick out they will be pressed too easily, and if they are recessed they will be too hard to press. I used one hex nut between bezel and perfboard to get just the right spacing on my keypad. Yours may vary - use washers as needed.
Once I had the perfboard mounted behind the bezel with the switches installed, I wired them up with 24 ga. stranded hookup wire according to the chart so conveniently provided on the oven's built-in service guide stored in an envelope above the cooking chamber. If your oven doesn't have such a chart, just peel apart the keypad and trace out the lines from each key to its outside and inside membrane connector pins.
I replaced the original 13-pin flex connector with two 6-pin Molex KK series connectors that I had on hand. Pin 7 on the keypad flex-cable is tied permanently to pin 13 on my oven, so I added a wire for that job onto the PC board.
Then I stuck the original keypad cover sheet over the switches, installed the controller PC board, plugged in the Molex connectors, put the oven together, tested it and it worked fine. Hooray.
Patient: Bogen tube-type PA amplifier, dead.
Sometimes you wonder how some products ever made it out of the design lab.
Sometimes there's so much wrong, you wonder if the item is a joke.
Someday I may relate the story of the no-name amplifier, but today's story is from a quite respected company, Bogen.
I acquired this Bogen PA amplifier, 50 watts out allegedly, pair of 8417s for output.
Nicely built, heavy-duty transformers.
Nothing works, so I put it on the bench.
I look it over.
The bad news: Output tubes have white getters, don't hold vacuum anymore.
The only visible good news: the pilot light is okay.
I don't have any 8417s, so I go to the computer to look them up. The number doesn't sound familiar.
I look up the tube specs, and whoo-boy, they have a heck of a transconductance, 23,000 micromhos!
I do a Google search, and find several references like "these tubes sometimes run away". Hmmm..... let's be careful...
I go to order some new ones, and no matter where I look, they're pricey-- $50-80 each. I finally find some on eBay for a somewhat reasonable price.
Meanwhile I look over the amp for obvious things wrong.
The cathode current balancing pot doesn't want to turn! It's not rusty, what's going on?
I open up the pot and see something unusual-- it's a wire-wound 30-ohm pot with a the wire wound around a gray plastic form. The form is badly MELTED and DEFORMED. How the ^#!$%!^? Let's see, 30 ohms, maybe takes 5 to 10 watts to melt it this badly, that's----- 400 to 800 milliamps!! No wonder the tubes gave up. I replace the pot.
The tubes apparently ran away to a very high current level. I check the bias circuit, looking for a bad voltage regulator, or a bad bias adjust pot.
No problems there.... there is no bias regulator OR bias adjust pot. Just your basic capacitor stealing a bit of the high-voltage AC and rectifying it, then dropping it down with some fixed resistors.
Hmmm, a pair of the most sensitive tubes ever made, and the designers don't make the bias adjustable! It's set by a couple of resistors, at about -15 volts. Luckily, this is just about right according to the cathode current I measure.
But if the line voltage goes low, so will the bias, and it doesn't take much of a drop to make these tubes conduct like crazy.... I make a mental note to add a Zener, or more appropriate for the era, a neon bulb, to regulate the voltage. And oh yes, I make a mental note to sell any Bogen stock I have.
A week later the tubes arrive, I plug them in, put a 8 ohm resistor and scope on the output, sine wave in. Time for FUN!
I turn up the line voltage slowly--- cathode currents are low and stable, whew. Everything looks good. I turn up the sine wave, and at about 20 watts out, the amp starts some ragged oscillating in the MHz on the sine-wave peaks. In about 5 seconds the tubes start running away! Good thing the Big Red Switch is nearby.
I look at the circuit to see what may have gone wrong with the oscillation-snubbing components. We'll there's nothing wrong with them, because they don't exist. There's NO snubbing resistors, not on grids, screens, cathode, or plates. No roll-off capacitors on the plates either. These are some of the highest gm tubes ever made, and apparently Bogen made NO ATTEMPT to tame the tubes!!
Argghh... I have no idea what the optimum value for grid-snubbers is for this tube, so I wire in a ballpark value, 2.2K. The combination "red red red" is a bit garish, but what the heck, we're somewhat peeved and desperate.
With the grid resistors in place there's no more trace of MHz oscillation at 20 watts. But when I crank it up to near-clipping, the fuzzies reappear and the tubes run away again. This time I'm soo befuddled I don't hit the switch until the cathode current has passed 500 milliamps! Well, at least we know these pricey tubes have plenty of cathode emission, or at least had it.
I think ahead about protecting these tubes in case they ever run away in the future when I'm not watching. The line fuse isn't going to do it, as it hasn't in the past. I ponder the desecrating effect of drilling two 1/2 inch holes to mount a pair of cathode fuse holders. Hmmm, better do it, originality be danged..
There's no easy way to add screen-snubbers without drilling holes and mounting terminal strips, so I look to taming the plates. I add a roughly in the ballpark plate-to-plate taming capacitor, 1,100 pF. Well actually, two 2,200 pF 1 kV capacitors in series. There's lots of voltage up there.
Now there's no oscillation on the peaks, and the tubes don't start any spiraling current death marches. But there's something else- the leading edge of the sine-wave has a big scallop cut out of it. How can this be?
A lot of probing around with scope probes and capacitors reveals nothing interesting. This is the worst of times, when everything looks okay except the output, and nothing you try seems to help.
For lack of anything better to try, I decide to measure the heater voltage.. I know, I know, the 6.3 volts on the heaters can't be far off, and even if it was it wouldn't scallop the sine wave this way, but let's waste 15 seconds anyway. I should use the voltmeter to measure the heater voltage, but I change my mind and use the scope. You see the new test leads on the meter have really hard to squeeze alligator clips, while the Tektronix scope probe is much easier to use. Plus I can use the mental practice of trying to divide the p-p voltage by 3 in my head. So due to pure lazyness, I use the wrong tool for the job. And due to this mistake, all the answers pop out at me!
The scope reveals that the heater voltage has a non-negligible amount of signal on it! I'm really puzzled now, wondering how 500 mV of signal gets into the heater lines, wondering how the designers never noticed this, wondering why I'm getting steamed at the shortcomings of a 45 year old design.
I decide to attack the symptom and put a .22 uF capacitor from heater to ground. The signal disappears from the heater voltage, and the output sine wave now looks perfect! Apparently there was feedback from the output tubes to the preamp tube, back through the heater wires!
What the bellepety-bleep! What the friggity-frig! How did this ever get past the designers? I solder in a 0.47 uF capacitor into the heater circuit. Lots of playing around with various frequencies and levels of sine waves, and I *think* the amplifier is finally stabilized.
(I should try it with some square waves too now that I think of it, but the square wave generator is out in the garage, which is at about 98 degrees, 90% humidity right now.)
So that's it so far. Had to get this off my chest. How could the designers have come out with such a shaky design? I put a nice sedate load on it, and it ran away every time! An expensive-looking amplifier, with many critical components apparently never designed into it.
If anyone has any ideas out there how this could have ever worked right, please contact me.
(From: Sam.)
Note that it's still possible that the modifications described above are just masking a more fundamental problem that is still present since it's likely the PA amplifier provided years of reliable service before being put on a shelf for a few decades. :)
-- end V1.27 --
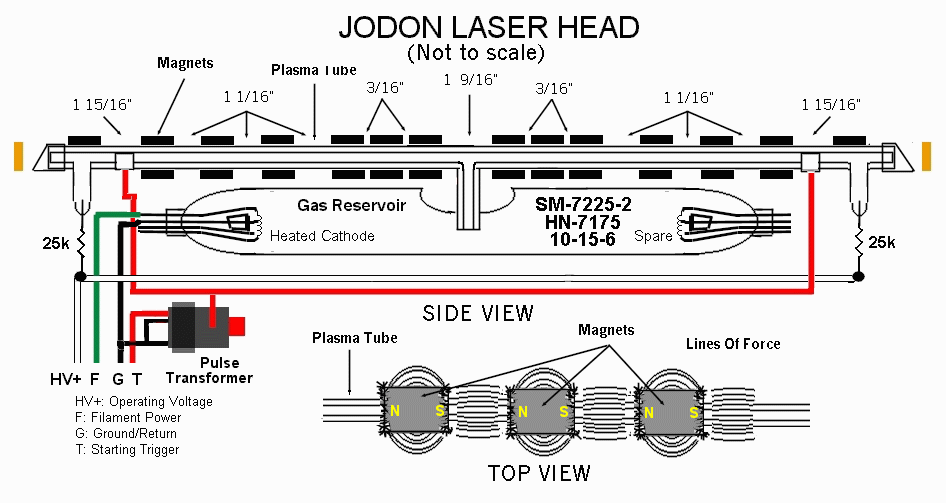