6091-019
 NOTE! This page is in a state of flux,
big time! I have to sort out the -019 and -19i stuff... So if you aren't
sure, don't! Remember, if the magic smoke escapes from your monitor, it
won't show the pretty pictures anymore!
NOTE! This page is in a state of flux,
big time! I have to sort out the -019 and -19i stuff... So if you aren't
sure, don't! Remember, if the magic smoke escapes from your monitor, it
won't show the pretty pictures anymore!
IBM 6091-019 FAQ
or info
Specs
and modelines for X11 and Windows 9x/NT
Cornerstone
ImageAccel MC1608C/11 and the IBM 6091-19 monitor
6091 Front Controls
6091 Rear Panel Connectors
6091-019 Modes
6091-19i Modes
Image Adjustments on -019
Focus Adjustment on -019
Brightness Adjustment on -019
Image Wrapping
Auxiliary Power Receptacle
6091-xxx Manuals
6091-019
Front Controls
Michael Wojcik wrote:
_Setup and Operation for the 6091 Color Displays_, IBM doc GA23-2114,
IBM p/n 39F9074, and _Maintenance Information for the IBM 6091 Color Display
(Model 19)_, IBM doc SY66-0206, IBM p/n 39F9007. You may be able
to order them by document number from Mechanicsburg. (Also, if you
can find the original hardcopy doc set that came with the RS/6000 the 6091
was attached to, both should have been included.)
The 6091-19 is designed to operate at 1280x1024 or 1024x1024, according
to _Setup and Operation_ (I have mine at 1280x1024). You can daisy-chain
up to five tubes off the IBM adapter, though that probably doesn't make
any difference to you. I'm driving mine with the old RS/6000 "Skyway"
2D Color Graphics Adapter, for reference.
The 6091 uses a cable with three BNC connectors for the RGB signals
respectively. The sync is carried on the G line normally. It
has additional jacks for other functions on the back panel, though.
6091
Rear Panel Connectors
(The sync input impedance switch affects the sync inputs. Set
to position 1 for High (2000 Ohm) impedance and 2 for Low (75 Ohm) impedance.)
Quoth _Setup and Operation_: "The 6091-019 display can attach to a PC
or non-IBM graphics processor that provides a compatible RGB video interface,
a refresh rate of 60 or 67 Hz, and external horizontal and vertical sync
(in Mode 3 only)." I *believe* that that last bit ("external ...
sync (in Mode 3 only)") means that you only have to provide external sync
if you're using Mode 3, not that you have to use Mode 3 and provide sync.
At 67 Hz, it has to operate in 1280x1024 (high) resolution; at 60 Hz it
can
do 1024x1024 or 1280x1024. Both are non-interlaced.
The mode switch is on the front panel, behind the flip-down door, along
with several other controls.
(The term "brightness override" comes from _Setup and Operation_.
Apparently this is used to check the brightness potentiometer; there's
something about it in _Maintenance_, but I didn't bother studying it in
any detail.)
Mike Palmer tries to (and
succeeds) confuse me by saying:
Horizontal refresh is 63.36 KHz if the Mode switch is set at 1 or 2,
and 70.7 KHz in Mode 3.
The 6091-019 can do the first three modes (Mode 3 can use internal or
external sync), only the -19i can do Mode 4.
6019-019 Modes
1 2
3 3
Sync on Sync on Sync on
Separate
Green Green
Green Sync
H Line Frequency 63.36kHz
63.63kHz 70.75kHz 70.75kHz
H Active time 11.478us
11.478us 10.6667us 10.6667us
H Sync Width
1.794us 1.794us 1.3333us
1.3333us
H Front porch
0.235us 0.235us 0.2667us
0.1333us
H Back porch
2.275us 2.275us 1.8667us
2.000us
V Frequency
60 Hz 60 Hz
67 Hz 67 Hz
V Sync Width
3H 3H
3H 3H
(H=1 line)
V Front porch
3H 3H
3H 3H
V Back porch
26H 26H
26H 26H
Total scan lines 1056
1056 1056
1056
Displayed lines 1024
1024 1024
1024
6091-19i Modes
1 2
3 4
H Line Frequency 63.36kHz
63.63kHz 81.32kHz 63.63kHz
H Active time 11.478us
11.4284us 8.6485us 11.4286us
H Sync Width
1.794us 1.786us 1.38us
1.786us
H Front porch
0.235us 0.232us 0.27us
0.232us
H Back porch
2.275us 2.268us 2.00us
2.268us
V Frequency
60 Hz 60 Hz
77 Hz 120 Hz
V Sync Width
3H 3H
3H 3H
(H=1 line)
V Front porch
3H 3H
3H 3H
V Back porch
26H 26H
26H 26H
Total scan lines 1056
1056 1056
528?
Displayed lines 1024
1024 1024
496
I'd check the doc for the adapter you're using to see if it will provide
internal sync on green. (I know Matrox used to make PC adapters that
did; they drove a monitor much like IBM's old RT "Megapel" display, the
precursor of the 6019.)
If not, you'll need to provide sync signals to the monitor using the
external sync ports. Might need some sort of special cable for that.
If you do hook up external sync, check the adapter's impedance and set
the sync input impedance switch accordingly.
I'd try fooling with the mode switch too. Maybe you've already
got a usable signal but the monitor is just in the wrong mode.
Desktop modes - Linux
---------------------
If you spend all of your time in an operating system with a "desktop"
(eg Linux X-windows) then the 6091-19i will work fine so long as you have
a video adapter that will go fast enough. To get the intended resolution
(1280x1024) you need a pel clock of about 110 MHz. The spec for your video
card ought to say what the maximum clock rate is.
In my case (a card based on the Cirrus 5429) the maximum is only 85MHz
so I had to sacrifice some resolution, and run it in 1024x1024 mode.
Under Linux, the desktop video timing parameters are held in a file
called XF86Config, probably in the /etc/X11 directory. The timing numbers
go in a modeline, for 1024x1024 I use:
Modeline "1024x1024ibm" 85.2 1024 1048 1208 1344 1024
1036 1068 1086 -hsync -vsync
which drives the 6091's mode 1. I would expect the line for 1280x1024
to be like:
Modeline "1280x1024ibm" 112 1280 1310 1510 1760 1024 1036
1068 1086 -hsync -vsync
You then need to reference this line in the later part of the file which
says
Section "Screen"
Subsection "Display"
with a line such as
Modes "1024x1024ibm"
"640x480"
where you can put several options and once X is running you can cycle
around them with Ctl Alt Pad+
Once you're close, there's a program for fine tuning display timings
(within Xwindows) called "xvidtune" and on my (Redhat 4.0) system lives
in /usr/X11R6/bin (which is probably automatically in your $PATH).
See the documentation for Xfree86 for much more
information on XF86Config, on my Redhat system it's in /usr/X11/lib/X11/doc/
e.g. VideoModes.doc
ATI GUP Reveries
Brad Parker had another
view to a thrill:
I've never been able to get the ATi GUP to run using the
Mach32 xserver,
however here is the why and how of getting it to display using the
generic SVGA xserver.
Why: The ATi GUP is a Vesa compliant video card. It also has a firmware
configuration utility available. I drive a fixed frequency IBM 6091-19
with mine. As the monitor only works at three specific frequencies, I used
the DOS firmware configuration utility to program in my specific needs
to the onboard eprom on the GUP.
How: There are two ways to do this.
First there is the hard way which uses a text file, similar
to the XF86Config file, which is read by a compiler like program that transfers
the info to the eprom on the ATi card. It's about as fun as figuring out
dot clocks. At one time Vesa member companies were supposed to supply the
owners of their monitors with this file. A few exist out there, mostly
for the NEC multisyncs, which really don't need them. Go figure...
And there is the Easy way, which is an interactive adjustment
program.
supplied with the ATi driver diskettes, available on the ATi web site.
This DOS program works a lot like the size and sync adjustments on a multisync
monitor. It reminds me of the AppleVision software for the Mac. As I knew
from the IBM specs what the 6091-19 needed, I just picked the closest preset,
which happened to be the Vesa 1280 x 1024 @ 60 Hz mode. This is known as
Vesa mode 107h (See Peter Wendt's excellent page on the XGA-2 card for
a list of other Vesa modes). I then entered the custom mode. Next I displayed
the test pattern with the ATi setup program and used the arrow keys and
what not to get the size, centering, sync polarity etc.. correct for my
monitor. Then I saved those settings, which get stored on the GUP's eprom
chip under, you guessed it, Vesa Mode 107h (I gave it a user friendly name,
but 107h is where it really is).
When setting up your xserver for Linux, choose the generic
SVGA server.
It's smart enough to figure out that the ATi GUP is a Vesa compliant
card. You edit the XF86Config file leaving all the entries for the display
settings that correspond to the ones you have programmed in the ATi card
using the above procedure. Don't worry about the dotclocks and such, just
use the basic resolutions, color depth and vertical refresh rates that
are closest to your monitors modes. Delete all of the others that aren't
supported by your monitor or the GUP.
Now when you start the xserver, it is simply going to
send a Vesa mode
change to your Vesa compliant ATi GUP card. The card will switch to
your custom mode that corresponds to the Vesa mode, like 107h in my particular
case. I'm fairly certain that it just ignores the dot clock settings and
all.
Now when you toggle through the various modes while running
X, the generic SVGA xserver just sends out various Vesa mode changes. See
the
SVGA howto for details on which modes correspond to which resolutions.
I've also used the ATi GUP in this manner with a Compaq SVGA and IBM
9524 (14P) and 9525 (15P) monitors. It was significantly easier with
the
multisyncing 14P and 15P than with the fixed frequency 6091-19.
Basically with the multisyncs I just used whatever was the default
Vesa
modes and adjusted the monitors to work with that.
The ATi does allow you to change the polarity of the sync, which comes
in handy as the 6091-19 needs a negative horizontal sync signal.
Image
Adjustments on -019
I have an ibm type 6019 19 color monitor and the screen is skewed
to the left by 1 inch. There are no controls on the outside of the
case to rectify the problem and I should like to know if there is a way
to centre the screen? Do I have to open the case and use a tv tuning
probe? How difficult is this?
Frank T. West wrote:
I recently purchased a 32H with a 6091 IBM monitor.
I had the same
problem with my display - grossly out of adjustment, beyond what the
front panel controls could correct.
There are four Phillips-head screws that hold the back
onto the "bezel"
of the display. Disconnect your cables and power cord and remove
these. The back will pop right off and reveal a neat entirely shielded
enclosure over all of that high-voltage scary stuff. Reconnect your
cables and power up your machine.
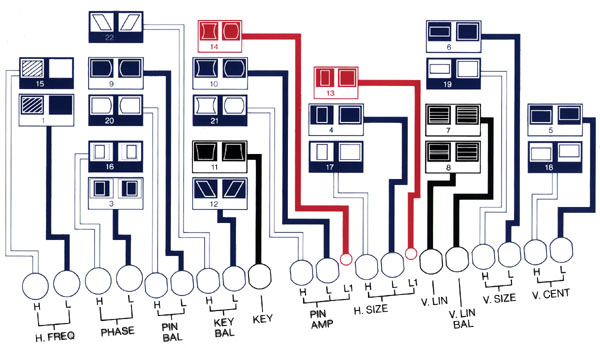
On the right side of the display is a bunch of adjustments
for everything you could imagine: centering, trapazoid, width, height,
etc. I got lucky and the little "tweeker" tool was still snapped
in its holder when I opened mine.
(Ed. The holder is on the interior shield
on the power switch side)
A couple of hours of fiddling (I'm quite the perfectionist) and it was
centered and clear as a bell.
Focus Adjustments
on -019
One warning: Don't adjust the focus adjustments (found
on the left side of the monitor) unless you absolutely have to. This
caused me great frustration and probably another hour of fiddling to get
them straightened out.
Brightness
Adjustment on -019
Helmut P. Einfalt wrote:
From the Maintenance Information manual:
<start quote>
1.1.13 Map 220
Symptom: Dull image (overall brightness is low)
Conditions that could cause this symptom:
-- CRT Cutoff (Screen Potentiometer Adjustment)
-- "A" PCB
-- "B" PCB
-- "C" PCB
001:
Perform the CRT Cutoff (Screen Potentiometer) adjustment. See 3.2.4
(from 3.2.4: CRT Cutoff (Screen Potentiometer):
... The image area background within the rast must be black. Set the
brightness Potentiometer on the front panel to its center detent. Set the
contrast fully on (CW).
Display the Black Flat Field test pattern. Adjust the screen potentiometer
(located on the high-voltage assembly, clockwise until the raster appears,
then turn the potentiometer counterclockwise until the background just
disappears. The blakc area of the test pattern should appear totally black.
This is a critical adjustment, a setting too far toward black results in
a loss of maximum brightness.
Brightness check, turn the brightness control full clockwise. The raster
should be visible as dark grey. Return this control to the center detent,
raster should just extinguish.
(3.2.5) Brightness Override Test
Press the brightness override button and observe that the raster bcomes
visible. Release the brightness override button. The raster should
return to black.
<end of quote>
all infos © IBM
all typos © HPE
The Screen Potentiometer (SCREEN POT) is located on the
left side
(viewed from front) of the monitor, the second counting downwards and
inwards from the farther top corner. Louis -- that's the "SCREEN" on
your drawing...
Image Wrapping
TheWiz wrote:
>> The image looks as if it is wrapping around behind itself on the
monitor. we can see some stuff, but it is not clear.
If the VGA-RGB cable you have has five wires on it (red,
green, blue, black, and white) you may need to swap the black and white
wires. I had a similar problem with some X-Stations that use a VGA-RGB
cable and the screens were scrolling around in every direction. I
was using non-IBM video cables (thanks to my cheap employers) and found
that the cables I'd purchased were wired a little differently than the
IBM cables. Swapping the black and white inputs (they control horizontal
and vertical refresh rates) did the trick.
Auxiliary
Power Receptacle
Pin 1 = -15vdc
Pin 3 = +15vdc
Pin 4 = +5vdc
Pin 2,4,6 = Gnd
Helmut P. Einfalt's entry
into the "Name This Port" contest:
According to the "Maintencance Information for the IBM
6091 Color
Display (Model 19)" (P/N 39F9007, SY66-0206-0) this is an "Auxiliary
Power Receptacle". Period.
I remember having stumbled over some reference to "Connectiong
this unit to a 6091-19" in relation with one of the 6093/6094 CAD input
gear
docujments, but I can't remember which one. However, part of theat
stuff
does have some DIN plugs cabling (and no, I've no manuals whatsoever)...
Ross Barker manages to blurt
out:
That's for an adapter to a ton of IBM Accessories such
as Plotters and Mice which write directly to the video, there is also an
interconnect to a very rare microchanel card which will Plug onto the board,
not sure exactly, that part I don't have, most of the rest I have. There
is a receptacle built into the base swivel which will accept another interconnect
box.
6091-xxx Manuals
Mike Palmer writes:
FYI, the docs are:
SY66-0206-01 39F9007 Maintenance information for the IBM 6091
Color
Display (Model 19)
SY66-0117-00 09G3524 Maintenance information for the 6091 Color
Display
(Model 19i)
GA23-2114-1 39F9074 Setup and Operation for the 6091 Color
Displays
GA23-2114-03 39F9074 Setup and Operation for the 6091 Color
Displays
Note the similarity in the last two! The -1 covers the 6091-019 and
the
6091-023, while the -03 covers the 6091-023 6091-19i and 6091-016.
9595 Main Page
|