Internal Tape Backup Unit (ITBU)

EZT_222.EXE    EZ-Tape V2.22 Backup Software (1 of 1) 
188-148  Announcement Letter 
itbudiag.exe    Internal Tape (ITBU) diags ver 2.0 
itbuopt.exe     ITBU Opt/Diag & Adapter Diskettes 
Adapter Cable Pinout and Construction (from 34 pin edgecard to 


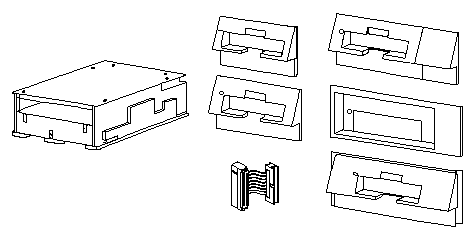
The IBM PS/2 Internal Tape Backup Unit is an internally mounted product that performs fixed disk backup and restore for the following IBM PS/2 products. 

8525, 30, 50, 55, 60, 65, 70, 80, 9556, 57, 76, 77 

The unit allows the user to transfer up to 80MB or 120MB of data from a fixed disk to a removable tape cartridge. The tape drive slides into the Diskette Drive B slot in the PS/2. 

The ITBU uses a 3.5" mini tape cartridge for operation. The following cartridges are supported: 
       3M Brand DC2000 mini data cartridge 
       3M Brand DC2120 mini data cartridge 
       3M DC2080 formatted Rhomat 80 Mbytes 
       3M DC2120 formatted Rhomat 120 Mbytes 
       (Any media that meet the specification in the  Proposed  ANSI Standard X335/87-218 "Unrecorded  Magnetic Tape Mini-cartridge"  for Information Exchange.) 

The Option consists of the following 
      Internal Tape Backup Unit 
      Internal Tape Backup Unit Option Diskette 
      Two tape cover plates 

The tape unit requires the IBM PS/2 ITBU Backup program for operation. This program is not provided with this option. (PCTOOLS V-7.x and other Utilities) 

Accelerator Cards  Irwin 4100MC 1-Mbit (MCA) 


HIGHLIGHTS
o   Supports PS/2 Models 50, 60, 70, and 80 
o   Up to 80Mb storage capacity 
o   Supports data interchange between PS/2 Models 50, 60, 70, or 80 
o   Internal unit 3.25" form factor 
o   Slides into existing diskette controller (Drive B position) 
o   Accurate head positioning using closed-loop embedded servo 
o   Uses 1/4" tape mini-cartridges 
o   Backup rate approximately 2Mb/minute. 

EXTENDED LENGTH MINI TAPE CARTRIDGES:
   It is IBM's current intention for the PS/2 Internal Tape Backup Program and PS/2 Internal Tape Backup Unit to operate with extended length mini-tape cartridges when they become generally available in the marketplace.  An American National Standard Institute (ANSI) standard for extended length cartridges is expected to be established in the future. 
       The use of extended length mini-tape cartridges with the PS/2 Internal Tape Backup Program and the PS/2 Internal Tape Backup Unit will allow users to store and retrieve up to 120Mb of data on one minicartridge. Ed. When did this happen? 

Installing the Tape Unit 
   Install the Tape Unit in an empty Slot or Tray. Connect the B-diskette drive cable to the ITBU connector. Install the model-required tape cover plate. On the backup copy of the Reference Diskette, install the Diagnose and @ADF-file with the COPY an OPTION diskette function. 

Cleaning the Tape Unit Read/Write Head 
   It is recommended that periodically the ITBU read/write head should be cleaned. The head must be cleaned if there are read or write / format errors or a large number of bad blocks. This should be done by using a cleaner cartridge. 


Drivers


Diskette Drive 34-Pin to ITBU 40-Pin Connector (Adapter Cable) 
From Bob Eager's Tavi PS/2 pages The page for the pinouts is HERE
   There is an adaptor cable that connects the 40 pin card edge connector to the newer 34 pin header connector. It is used (for example) when installing the Internal Tape Backup Unit (ITBU) or the External Diskette Drive adaptor (the dummy drive cage) to machines that do not use the edge connector interface. It might also be useful in extremis if it were necessary to fit an older drive to one of the newer Model 80s (the actual drive retention cage is the same). 
   The IBM version of this cable uses about 3cm of 34 way ribbon cable, with the (female) edge connector on one end and a (male) header connector on the other. However, wiring is not 'straight through'; the power connections differ between the two interfaces. 
   Ed. Dalco has 40 Pin IDE Edgecard Connector $ 0.30  go HERE
   NOTE: This goes to a header on a Model 80, and I would heartily recommend checking the pinout for the 40 or 44 pin header used on the later systems BEFORE you wire this up... 

Edge conn pin   Header conn pin       Signal 
       1               1              Ground
       2               2              -High Density Select
       3          No connection       Reserved
       4               4              Drive Type ID 1
       5               5              Ground
       6           No connection      Reserved
       7               7              Ground
       8               8              -Index
       9               9              Ground
       10              10             Reserved
       11              11             Ground
       12              12             -Drive Select
       13              13             Ground
       14              14             Reserved
       15              15             Ground
       16              16             -Motor Enable
       17              17             Ground
       18              18             -Direction In
       19              19             Ground
       20              20             -Step
       21              21             Ground
       22              22             -Write Data
       23              23             Ground
       24              24             -Write Enable
       25              25             Ground
       26              26             -Track 0
       27              27             Ground
       28              28             -Write Protect
       29              29             Ground
       30              30             -Read Data
       31              31             Ground
       32              32             -Head 1 Select
       33              33             Ground
       34              34             -Diskette Change
       35         No connection       Ground
       36         No connection       Ground
       37         No connection       Ground
       38              3              +5V DC
       39         No connection       Ground
       40              6              +12V DC
 

   In practice, manufacture of this cable is fairly straightforward. Cut a short piece of 34 way ribbon cable (about 6cm). Fit the 34 way header connector in the normal way, remembering that the edge with the red stripe goes to pin 1. Separate out wires 3 and 6 for most of the length of the cable, leaving about 1cm intact nearest the header connector. Cut the three main parts of the cable (wires 1-2, 4-5, and 7-34) back to about 3cm in length. Trail wires 3 and 6 across the surface of the rest, and hold temporarily in place with a small piece of sticky tape. Fit the edge connector loosely, making sure that the wires all go in the right connectors (a gap of one wire between each of the first three sections, counting from pin 1, a 3 wire gap to the single wire from pin 3 on the header, and a 1 wire gap between that and the final wire (from pin 6 on the header). When all is in place, crimp it all home. 

It may be worth winding some wide tape round the cable, transversely, to avoid the two single wires snagging on something when the cable is fitted. 


Bob Eager sez
> Is there a utility for formatting rhomat tapes of 120 meg?  I have
formatted many of the 80 meg but my utility doesn't include 120 meg and they show only 80 meg when using that utility.  Thanks Les

   You need to realise (if you don't that is) that there are TWO 
different lengths of tape you can get. One is the 205 foot version, 
and the other is 307.5 feet. The numbers are somewhat confusing and 
depend on whether pre-formatted, but DC2000 is usually the 205' one, 
so is DC2080 (80, you see). DC2120 is the 307.5' version and is not 
usually formatted (confusing!).
   If you have a 205' tape you CANNOT format it to a greater density. The
Rhomat format is already packing more onto the tape than most formats 
do.  Of course, compressed you may be able to double the capacity but 
that is not a formatting issue.


9595 Main Page