|
5494 Remote Control Unit
You will need a 2.88MB floppy to extract some of these!
Release
3.2 Microcode Diskettes
Release
3.2 Patches
Release
3.2 Feature Patches
Related
Redbooks
co20bk055494
Remote Control Unit R3.2 Bookshelf
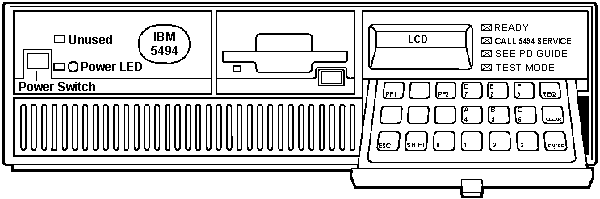
5494 Front
5494 Planar
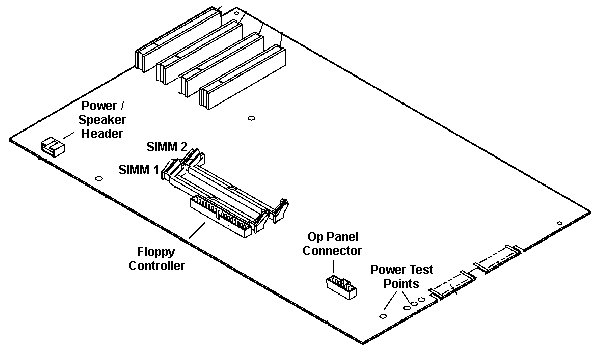
P13 Operator Panel Controller Pinout
1 Ground
2 Operator Panel Reset
3 Ground
4 Transmit Data
5 Ground
6 Planar Reset
7 Ground |
8 Recieve Data
9 Ground
10 -5V
11 Ground
12 Speaker Data
13 Ground
14 Reserved |
5494 Operator Panel Components
The operator panel is located on the right-hand front
side of the 5494 and consists of a keypad, an LCD, and four LEDs (Ready,
Call 5494 Service, See PD Guide, and Test Mode) that indicate operating
status. An 8051 microprocessor controls the LCD, LEDs, and the keypad.
Communications between the planar and the operator panel are through a
serial port.
The LCD has 16 character positions. It is blank and displays a cursor
in
| the rightmost position when not in use. When the 5494 operator panel
is in use, there will always be a message code (002-01 in the above example)
displayed on the left-hand side of the LCD. The message codes are described
in "Message Codes" in topic 3.1. When the 5494 is in use, the LCD can also
contain, in the data field on the right-hand side of the LCD, a system
reference code (SRC) or information as defined by the message code. In
the example, the data field contains an SRC.
If an error occurs before or during normal operation, both a message
code and an SRC will be displayed on the LCD and an LED will be lit. If
more than one error occurs during normal operation, the message codes and
SRCs will cycle at 3-second intervals. If the error clears (a link is established
after a failure, for example), the message code and SRC will be removed
from the LCD by the 5494.
Normal Power-On Display Sequence
Soon after the 5494 power pushbutton is set to ON (|):
1. All LEDs are ON for 1 second.
2. All LEDs are OFF for 1 second.
3. The Test Mode LED is switched ON.
4. 001-01 is displayed, indicating that POST is
running.
5. The date and time are displayed on the LCD.
6. The microcode is loaded.
7. The Test Mode LED is switched OFF.
8. Within 10 seconds, the Ready LED is switched ON
Keypad Description
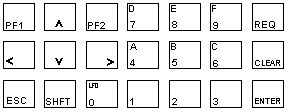
The keys on the keypad allow commands to be entered and sent to the
5494, and include:
REQ Initiates a request function
PF1 Used for special requests
PF2 Used for special requests
Esc Used to cancel a request
Alt Enables the alternate hexadecimal
values of keys 4 through 9, to be used with keys PF1, PF2, and Esc for
additional special functions. (Ed.
Might be the SHFT key)
Enter Signals to the 5494 the end
of an input string
Clear Clears a value being
entered and allows you to begin again
0 to 9 Numerics 0 to 9
Alt+4 Hexadecimal A
Alt+5 Hexadecimal B
Alt+6 Hexadecimal C
Alt+7 Hexadecimal D
Alt+8 Hexadecimal E
Alt+9 Hexadecimal F
Up arrow Scroll up through several
choices or panels of data
Down arrow Scroll down through
several choices or panels of data
Left arrow Move the cursor left
or scroll to additional fields of data
Right arrow Move the cursor right
or scroll to additional fields of data.
If you hose the refstamp, the 5494 will not boot up and
the error code '003-04 1' is displayed on the Op Panel.
Model Conversions
Model 001 or Model 002 to Model EXT. Model 001 and Model 002 can be
made functionally equivalent to Model EXT by installing level 3.0 microcode
or later.
9595 Main Page
|