8590/9590 PSU90 PSU Models Remove Model 90 PSU Open 90 PSU Myth of "Weak 90 PSU" Debunked! Testing the 90 PSU Planar Power Contact Oxidation Cleaning Your Contacts (for the PSU, not your eyes!) 90 PSU Pinouts Check the voltages with connectors P1 and P2 plugged into the system board.
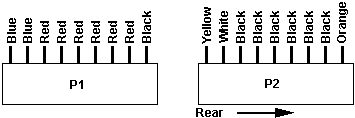
1 (P1) 2-7 (P1) + 4.8 + 5.25 1 (P1) 8,9 (P1) +11.5 +12.6 2 (P2) 1 (P2) -11.5 -12.6 B D + 4.8 + 5.25 B A +11.5 +12.6 Conductor Functions
There are two systems fans: one in the power supply, and
a second fan on the base. If the power supply fan does not work, replace
the power supply. If the second fan does not work, replace it.
Power Supply Models There are at least two different PS for the 90- I have heard rumors of a 150W PS. Rich Wolos said
64F4114 194 watts (from Jan 92 HMM)
92F0088 215 watts (from 96 HMM)
Remove Model 90 PSU 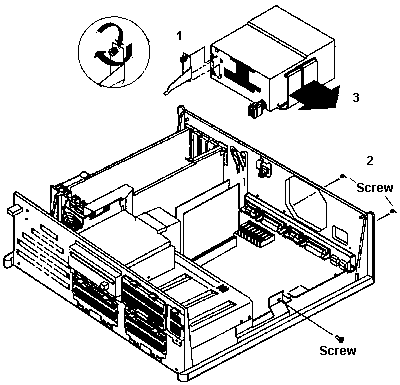
Unscrew the captive screw on the power-supply support leg. Pull the top of the support away from the PSU and continue rotating it forward until the support is free of the bottom clips on the PSU. Now pull the support towards the rear of the system until the front tip can be pulled from the drive shelf. Now unscrew the three standard screws from the PSU. Unplug the planar power supply sockets from the board and pull the PSU out. Opening the 9590
PSU
Little Big 90 > I'm worried about heat during extended sessions. There are no drives in the case sucking power and no bulky SCSI cable, but that still doesn't resolve the fact that the 90 really wasn't meant to take a Pentium. From Al Savage
Testing the 90 PSU Peter Wendt sez: The most important point is that the "testing the power-supply" topic extends only on testing the thing as "one box" and *not* open it. You should leave that to trained experts, because it bears some risks - from which sudden death is the most evil (can spoil the whole day - and more). This sort of "shocking experience" should be left out. The easiest way to test the power-supply if it is still working at all is to open the case, look at the right side under the power-supply, locate the 2 plugs from the power supply to the systemboard and carefully unplug them by simply pulling them out. It might be a bit difficult to get them back this way - but if the power-supply is broken you will have to remove it nyways when you get another one, so we can leave that at the moment. Now: once you got the two plugs pulled out - look at them. The one "P1" marked connector has 2 blue, 6 red and 1 black cables ... that's the lesser important one at that point. The second "P2" marked is the one we need to look at closer. Do the following: re-attach the machine to the AC, then use a piece of wire or a bended paperclip and connect the white wire with one of the neighboring black ones. No danger - the highest voltage on that side of the power-supply is +12VDC. the white line is "+5V sense voltage" and the black one is GND. As long as the white wire isn't attached to GND the other voltages are 0 VDC (power supply de-activated) so there is no risk of accidently shorting any voltage at all. In case the connection is good and the power-supply itself is functional the power-supply fan should come up - and most likely the machines' harddisks as well, which are directly attached to the power-supply with 4-wire DC-cables. If the power-supply comes up the problem sits somewhere else: - broken connection between ON/OFF switch and board (low - voltage) - broken systemboard - defective complex (but at least the green power-LED should light up then) In case nothing happens apart from a faint "click" inside the power-supply ... now ... get familiar with the idea of getting a spare from somewhere. It often pays trying to get an entire working machine rather than only a power-supply. Mod. 8590 without harddisks and memory often sold for some 30 - 40 bucks ... some ask 40$ for the power-supply alone. The 9590s may cost some more - the power-supplies however are identical as far as I know. The main difference between an 8590 and a 9590 is the 1.44MB FDD on the 8590 and that some versions come with only a 512K XGA-1 on the planar. Everything else (processorboard, memory, power-supply, harddisks) can be interchanged among the models. A high pitch whistle indicates the PSU will not pass this test and is broken. Usually these power-supplies are pretty reliable - some of them suffer on "long term problems" with dust contamination and related overheating. In case there were an over-current condition (overload on +5V / +12V lines) it should come up in the above-mentioned test - if that malfunction is not caused by the harddisks. Try detaching the 4-pin power-plugs from the harddisk(s) and retry ... if the malfunction persists even with nothing attached to the power-supply it is definitely broken. To fix these kind of "switching power supplies" you need some more equipment than only a multimeter, a pair of scissors and a roll of duct-tape. Parts inside these supplied are directly connected to mains AC and converted into DC impulses of hazardous voltages and frequencies ... so I would not even recommend trying to open the box if you do not exactly know what you are doing. In case of doubt: leave it as it is. There are a few "power-supply gurus" out which may be able to repair the unit - but they are hard to find. Planar
Power Supply Contacts
Cleaning Planar and Plugs
(1) Remove the power supply from the case. Look HERE.
First, remove the power connections from any internal devices (hard drives,
CD-ROMs, etc), remove the sheet metal "bracket" between the power supply
and the
(2) At this point, you can easily look at the planar and power supply connections, and they'll probably look OK. Don't be fooled. Take a small piece of ScotchBrite (that green plastic scrubby stuff that is frequently used to scrub pots and pans) and LIGHTLY buff the planar solder pads to make them nice and shiny. Buff the power supply connector fingers with an emory board - again, just a light touch is needed, rub each finger two or three times. (3) Slide the power supply connectors on the motherboard pads, then remove the power supply connectors again. Do each of the pads show marks where the power supply connector fingers dug into the solder pads? If not, you need to re-tension the fingers that did not make a mark. (4) Once all the fingers make marks, re-install the power supply and
power connections to your devices. Power up and enjoy reliable 9590
power for several more years.
|