9553
193-350
53 486SLC2 (-0B7 / 0BB) 53LS 486SLC2 (-1BX / 2BX)
rf9553a.exe
Reference disk for 9553 V1.10
rd9553a.exe
Diagnostic Disk for 9553
9553 Planar
Remove Password
Serial and Parallel Ports
IDE Controller Trivia
Floppy Cable Hack
Windows 95 drivers
Graphic Modes
Supported
Power Manageable
Display
9553 Riser
Open the Case, Remove Front Bezel
9553 Planar
71G5951

F1 PTC for KB/Mouse
J1 KB
J2 Mouse
J3 Parallel
J4 DB25 serial
J5 HDD15 Video
J7 HD LED
J8 PSU connector 1
J9 Privilege
access password
J11 Password-override
connector
J12 PSU connector 2
J13 Power connector, +5,+12,Gnd
J14 IDE controller
J15 Floppy |
U3 22.1184 MHz osc
U7 LT1141CS
U9 14.31818 MHz osc
U11 CL-GD5426-80QC-A
U12 10G4672
U14-16 72 pin SIMMs
U18 Dallas DS1387
U19,20 (21,22)
KM416C256AJ-6
U29 80C2077SL
U47 MX 82G1767
U48 96F7690
U49 486SLC2
U61 50.0000 MHz osc
U63 PLCC Socket for 387SX
Y1 R24CA33 xtal |
They're souped-up 8555SX with the Reply-Corp. systemboard. IBM made them
originally as "special bid" units for certain customers that needed a machine
with small footprint and better performance than the odd 386SX-16. It turned
out to be so good that IBM officially made it Mod. 53. The leading 95-
is a result of the onboard Cirrus Logic SVGA - making the units "PS/2 Premium
Line" machines.
supports only 2, 4, and 8MB 70ns
The Enhanced 2.88MB Diskette Drive's (#1272, 6451272)
electronic diskette eject button feature is supported. The software-controlled
diskette eject feature and the ability to lock a diskette into or out of
the drive are not supported.
SurePath (TM) BIOS
Remove Password
> We have a PS/2 model 9553 at work, and the previous user (who transferred)left
the password 'feature' enabled. How can I reset it?
Bob Eager
Look for jumper J11, on the right hand side of the system board (looking
from the front); about halfway along the edge of the memory connectors,
between them and the edge of the board.
This is a 3 pin arrangement with the jumper bridging the middle pin
and one other. Move it so that it bridges the middle and the other pin.
Power the machine up. No need to put the jumper back; it's the CHANGE
that is detected.
Serial and Parallel Ports
Serial ports use IRQ 3 and 4 with MANY IO choices
Parallel port is DMA arbitrated and uses IBM IO and IRQ7
only.
IDE Controller
Trivia
From the planar ADF: PE3FE.ADF (on the refdisk)
Scroll down to the last section in the Planar ADF and you
will see:
NamedItem Prompt "ATA Fixed Disk"
choice "Enabled"
pos[20]=XXXXXX11b io 1f0h-1f8h int 0eh
; choice
"Alternate"
;
pos[20]=XXXXXX01b io 170h-178h int 0eh
choice "Disabled"
pos[20]=XXXXXXX0b
If you want to use the alternate IRQ14/IO170h-178h, remove both
of the ";" from this section. Save the file and reboot with the refdisk.
ATA Fixed Disk
<"Enabled" (1f0h-1f8h int
14)>, Disabled
These options are commented out: Alternate (170h-178h int 14)
Floppy Cable
Hack (71G6009)
These little dapper devils are relatively simple. Parts:
40 pin IDC
Clone floppy cable
The cable goes straight from the 40 pin header out to the
first floppy connector, then it twists pins 10-16 around, then continues
with pins 17-34
Optional!
Take needlenose pliers, pull the insulation displacing
points on the 40-pin header at 3, 6, 35, 36, 37, and 39. Leave 38 and 40
at the end.
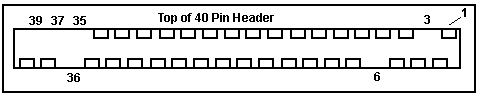
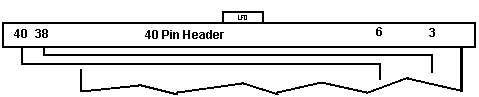
Now measure
out 9". You should have about 2" past the 40 pin header. Now bring
out 3 and 6, cut the rest of the conductors flush at the 40 pin. Now bring
them around the back, over 38 and 40 and exit the connector towards
the 34 pin header. Crimp. A little ticklish getting 3 and 6 onto the slots
of 38 and 40, but it's sooo much neater.
Windows 95 drivers
The "Cirrus Logic" driver included in the Windows 95 distribution
disk(s) should support most implementations of the CL-GD542X chips, but
only if it has a video BIOS version of 1.30 or newer.
Check this with MSD, IDCHIP.EXE, or a similar utility.
If you have a BIOS that is to old you must get a update from the video
board manufacturer to use Win95 with your board.
Graphic
Modes Supported
DEVICE DRIVERS SUPPORT MONITOR SUPPORT
Graphics Color/
---------------------- ---------------
Modes
Pallet DOS Windows* OS/2
VERTICAL (Hz)
===========--======== ====--=======---======
===============
640 x 480 16/256K Y(i)
Y Y
60, 72
640 x 480 256/256K Y
Y Y(a)
60, 72
640 x 480 32K
- -
- 60, 72
640 x 480 64K
- Y
- 60, 72
640 x 480 16M
- Y
- 60
800 x 600 16/256K Y
Y Y(b)
56, 60, 72
800 x 600 256/256K Y
Y Y(a)
56, 60, 72
800 x 600 32K
- -
- 56
800 x 600 64K
- Y
- 56, 60
1024 x 768 16/256K Y
Y Y(b)
60, 70, 72, 87(c)
1024 x 768 256/256K Y
Y Y(i,a) 60,
70, 72, 87(c)
Note (i) ISO certified with specific fonts, typeface, and monitors.
Note (a) Not supported by OS/2* 1.3.x or 2.0 w/o Service Pack.
Note (b) Not supported by OS/2 2.0 with Service Pack or 2.1
Note (c) Interlaced
The system maintains compatibility with CGA, EGA, and VGA modes.
Power Manageable
Display
If you have attached to this system a power manageable
display that conforms to the\VESA Display Power Management Signaling (DPMS)
interface, like IBM 952n or 632n Color Monitors, then using the DPMS
enabled BIOS utility package will save you power. The power savings is
accomplished by instructing your display to go into various power saving
states after a period of user inactivity has been detected. DPMS will put
your power manageable display into one of three different states:
1.Standby: Minimum power savings but immediate return to ON.
2.Suspend: Medium power savings but medium return to ON.
3.Off: Maximum power savings but noticeable delay in return
to ON.
The timeout defaults may be changed from 1 to 99 minutes.
After December 1993, the DOS and Windows* DPMS utility package may be
obtained from:
IBM PC Company BBS - (919) 517-0001
OS/2 BBS accessed via ADVANTIS
CompuServe Information Service
9553 Riser
FRU P/N 27F4666
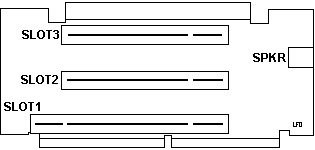
What is that funky 72 pin edgecard for on top? Tell ME!
Riser bracket is 27F4599
90-watt worldwide, manual switch, power supply with cooling fan
average of 1.6 amps per slot
Open the Case
Use a standard screwdriver to free up the two captive screws
on the lower front sides. Slide the top back about 1/2 inch, lift it straight
up.
Install Cover
First, look at the lower rear of the cover. Notice the bottom
edge has about a 3/4 inch angle where it does not reach the end. Hold the
cover so the back edge is over the rear side of the case. Lower it down
until it rests on the case rails, then pull forward.
NOTE! The front bezel snaps onto
the case frame. When you open the case, you will have a wide "U" shaped
cover in your hand, the front bezel stays put!
Remove Front Bezel
Remove the cover. Look to the outer side of the speaker/card
guide assembly. See the two white latches? Press them outwards and pop
that end off. Now look at the other side by the power switch. See the wide
latch? Press it inwards and pop the front bezel off.
Ed. it might be a little different way
to press the latches, but there are only two choices, and if you can't
figure that out, a PS/2 is not for you.
9595 Main Page
|