Dell
Latitude D800 Secondary Fan Repair
My Dell Latitude D800 had a noisy fan. I could hear the distinctively
roughy and gritty noise from time to time as this fan would start up.
However, it didn't seem to be coming from the main CPU cooling fan that
is located near the left display hinge (as you would see it with the
machine open and in normal operating position).
Since its warranty was due to run out in March of 2008, and there were
a few other problems that needed to be taken care of, I called Dell
technical support and explained all the problems. They were very polite
and professional to speak with. The first technician I spoke to assured
me that all my problems would be fixed and that they'd send a box out
to collect the machine.
They did send a box out. They did not, however, fix all the problems
that my computer had. The main CPU fan had been replaced but it did not
help. The gritty fan noise would still come and go. It also came back
with one new problem--when this machine started up, it claimed to be a
Precision M60 instead of a Latitude D800. Oops.
I called Dell again. They were still very polite, but this time I
followed the advice given on the alt.sys.pc-clone.dell newsgroup. I
enclosed a detailed note explaining the problems the machine was
having, including the noisy fan. I was careful to note that I did not
think the CPU fan was at fault.
Dell cured all of my computer's ills except one. Yes, you guessed it.
They did not get the secondary fan.
Why? I don't know. I probably never will know. Having perused the
online service literature for my computer, however, I have come to the
conclusion that perhaps the nice people at Solectron (Dell's contract
repair outfit, now better known as Flextronics) do not know that there is
a secondary fan in the system. The online service literature never
talks about such a fan, but it does show up in exactly one illustration:
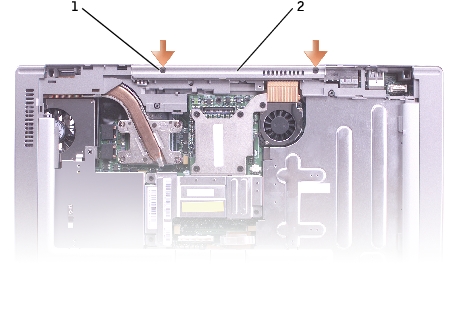
Ahh...so there it is, to the left of the second shaded arrow. (The
above excerpt actually comes from the palmrest removal procedure.)
I wasn't even going to bother sending the computer in to Dell again. If
they hadn't fixed it two times now, why would they fix it if I were to
complain? (A better question, perhaps, is what might they break or do
incorrectly? I know that sounds bad, but I couldn't help but wonder and
worry!)
In other words, it was...
Time
To Break Out The Screwdrivers!
I know there's a second fan in the system. Some exploration with the
excellent i8kfanGUI software proved it long before I ever saw the above
illustration. And while I generally dislike servicing laptops, I have
done it before. This time I even had the benefit of service
literature, whereas before I did not.
Then I got to
thinking--I'm not the
only Latitude D800 owner out there who might have this problem. So I
made this page to describe the process of removing and repairing the
secondary fan in my computer.
It should go without
saying that if you are doing any of this to your own Latitude D800
laptop computer, you
are doing so strictly
at YOUR OWN RISK!
If you break your laptop, damage something, hurt yourself, hurt others
or anything bad happens, YOU are completely responsible for the
results. This information is presented as a good faith effort, but I
make no guarantees that it is accurate or safe for your laptop. All I
can say is "it worked for me". Your mileage may vary.
Also: A GOOD set of precision hand
tools is a REQUIREMENT. Do NOT even THINK of doing this with poor
quality or inappropriate tools. If you don't have good quality
precision hand tools, go out and buy some right now. I'll wait.
Got your precision hand
tools now? Good. You're almost ready to use them.
You will also need:
- A clean space to work.
- Plenty of light.
- An egg carton to hold screws
- A pen or marker to label the compartments where you store
the screws
- Some kind of oil. Motor oil or light machine oil is
suitable for this task.
What
Does The Second Fan Do?
After taking my system
apart, I can
tell you exactly what it is used for. Not only does it help to cool the
graphics processor, it also serves to cool the chipset--or more
accurately, it helps to cool the Intel 855 north bridge portion of the
chipset. I didn't even see the south bridge while inside, so it may be
on the underside of the board or underneath another part. In any case,
most south bridge chips don't get all that hot in normal operation.
Getting
Started (or
"where is that fan?")
Shut
your computer completely down. Do NOT put it in standby or hibernation.
Disconnect the AC power adapter and remove the battery. Work in a well
it area. Print these instructions out for reference or have a working
computer nearby while you do this.
If you looked at the
illustration
above, the second fan is under the keyboard. I'd place it beteen the U
and P keys, or maybe a little higher than that.
To get to the fan, you
will need to
start by removing the topmost trim piece--the one that has the power
button and your computer's model number printed on it. This is designed
to pry up from the left hand corner. Insert a fine-tipped bladed
screwdriver into the "pry point" that is molded into the module.
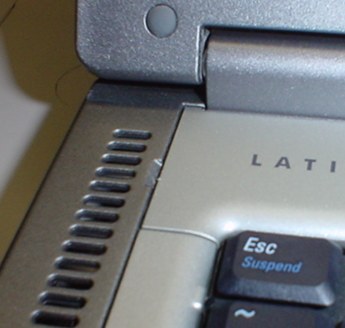
Tilt the display all the
way back. It will go nearly flat. You have to do this before removing
the trim, or it will not come up.
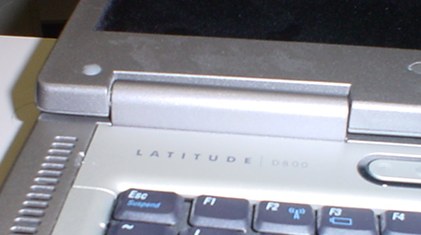
CAREFULLY pry the trim
loose. It is
held in a few different places. When you get all the way to the other
end, there is a cable that provides power to the status LEDs. This is a
"tape" style cable. Using the grip provided on the connector (do NOT
pull the cable itself) disconnect this. At this point you can set the
trim panel aside. You are done with it for now.
What you have now should
look a little like this:
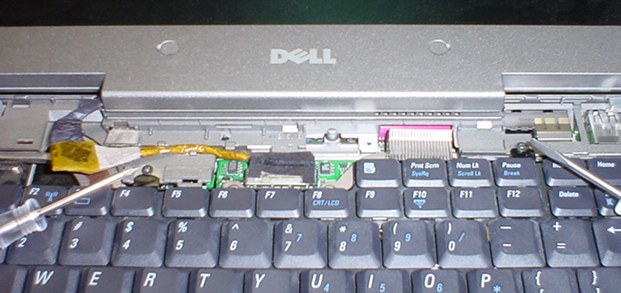
In the picture above, I
have pointed
two screwdrivers at the keyboard screws. You will need to remove these.
Although one screwdriver in the picture is a bladed type, both screws
are phillips head screws. Remove them and set them aside.
Note: Some of the screws
you will be
removing are of different types. Length, fineness of the threads and
thickness will differ. It would be a good idea to get something like an
egg carton to put the screws in. This will not only keep them from
rolling away...you can also label the compartments so you know which
screws went where.
The keyboard should be a
little loose
at this point, but chances are it will remain firmly in place. This is
because there are two "tips" on the upper right and left sides of the
keyboard assembly. They need a little persuasion to come loose.
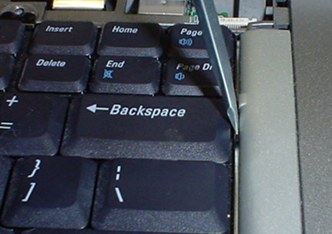
When you get them both
freed up, the
keyboard will lift out. This is a delicate assembly--don't force it.
(You shouldn't force anything during this procedure, but this is doubly
true for the keyboard.) At this point the keyboard will be "free". It
is
still plugged in to a connector on the motherboard. You can unplug it
if you want. It is possible to do everything you need to do with the
keyboard plugged in, but it does put some strain on the cables going to
the "trackpoint" device in the middle of the keyboard. If you want to
unplug the keyboard, move it so you can see the blue grip tag on the
connector. Grasp this and pull it straight up.
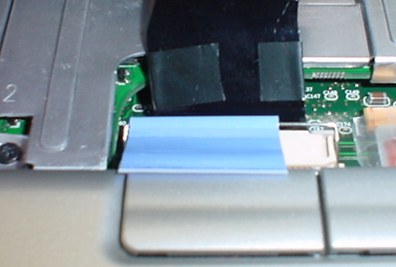
Set the keyboard aside.
Put it somewhere where it won't fall on the floor.
Now you can see the fan
in question quite clearly.
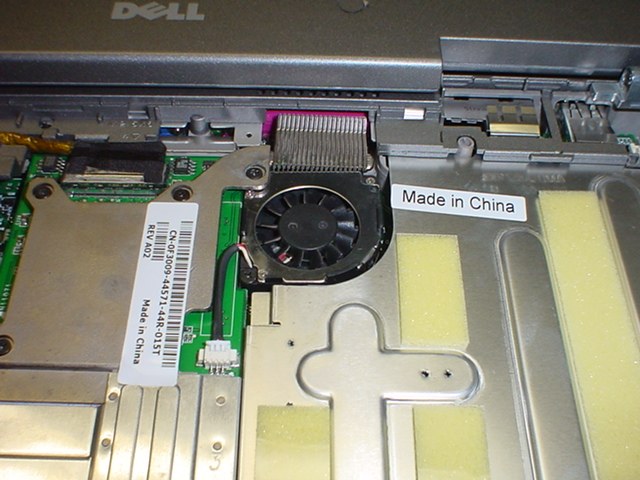
You can see that Dell
has used a
so-called heat pipe to channel heat away from the graphics processor
and north bridge. It leads to a little radiator like structure that the
fan blows through.
This is why many laptops
get
overheating problems later in their lives. These little radiators plug
up over time and become lots less effective at removing heat. As a
result, the computer overheats and eventually breaks.
To get the fan out, you
will be removing some metal shielding, the video card, LCD connection
cable and more than a few screws:
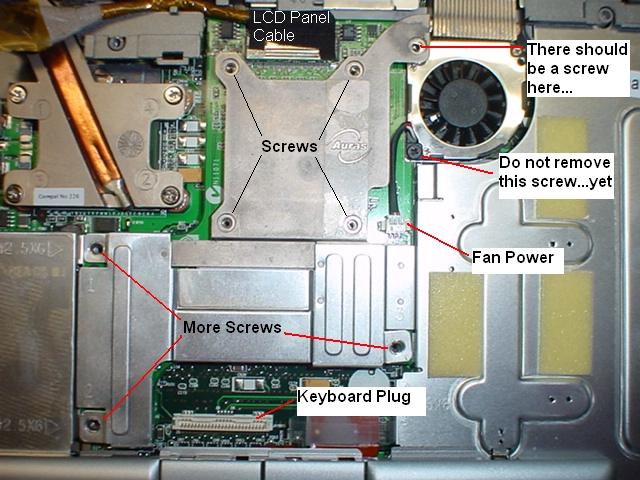
Start by removing all
four screws
from the thick heatsink plate (this is the piece that says "Auras" in
the picture. There is a fifth screw that should have been in the
picture but wasn't because I had done this once before and forgot to
put it back in place.
Now unscrew the other
screws, labeled
as "more screws" above. These screws secure a thin metal plate. When
all is said and done, you should be able to remove the thick "Auras"
plate as well as the thin metal plate. Keep in mind that the thin metal
plate has tabs that hold it to the video card near the two bottom
screws. As such, you will have to play around with it a little bit
before it will come out. It bends easily, so be careful.
Make sure you separate
the screws by
type and label where they go. Dell does provide a nice printed guide
(which you can see at the lower left of the picture) for some of these,
but it is no replacement for keeping everything labeled so you know
exactly how it goes back together!
You should have a
heatsink all by itself, with an attached radiator when you get done.
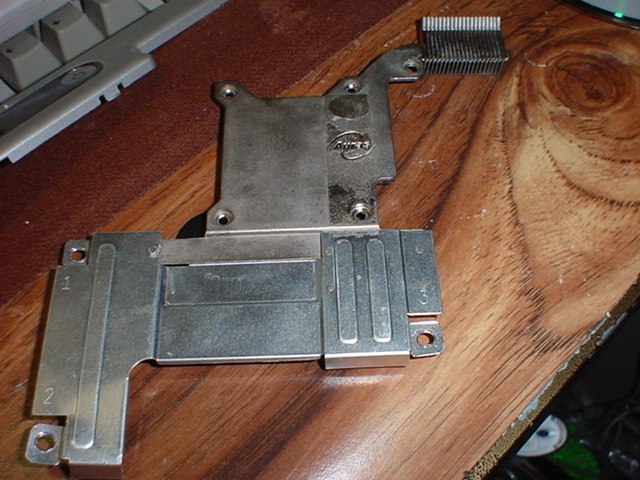
That's right. The fan
doesn't come
out with the heatsink. It is attached to a thin metal plate that runs
underneath the video card.The metal plate is anchored by four holes
drilled through the video card's circuit board. Its purpose is to make
contact with the chipset to let it shed heat.
Before going any
further, you might want to clean the lint out of the radiator. Since
you're in there anyway, why not?

The video card is now
visible.
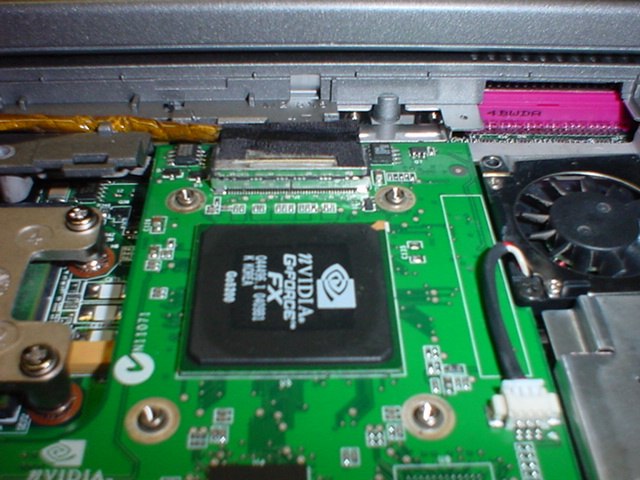
What it is NOT, however,
is free. Do
not try to remove it just yet. Carefully pull up on the edges (and NOT
the cable) leading to the display panel connector. This is the silver
connector at the top of the picture above. Disconnect it and lay it
aside. You will find a screw underneath it. Remove this screw and put
it away.
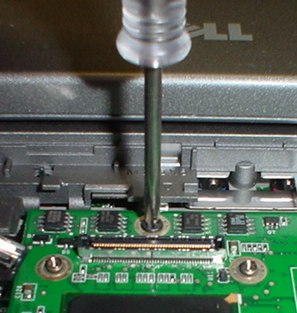
The video card is
connected via a
large plastic plug at the lower left corner. Ease the card up, focusing
on this area so as to avoid putting undue strain on the connector. The
fan assembly will be loose, but it should come out with the card.
When you get them out,
you can see the north bridge:
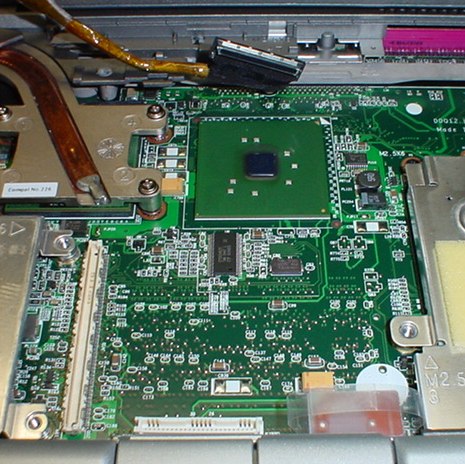
On the video card side
of things, you'll have something that looks like this:
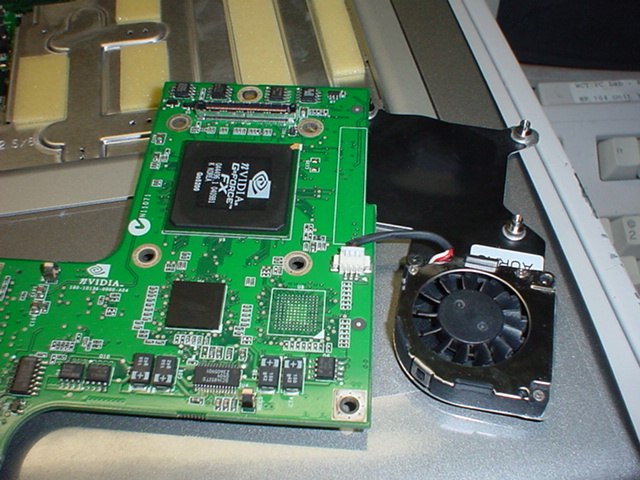
If your fan is like
mine, it may have come out of the four holes that hold it to the video
card.
There is thermal
compound on the
bottom of the metal plate that the fan is attached to. This compound is
pressed against the face of the north bridge when everything is put
together. If you're careful and don't disturb it too much, you won't
have to try to re-apply it. I found the compound on this assembly to be
pretty rigid.
And here is
the fan by itself:
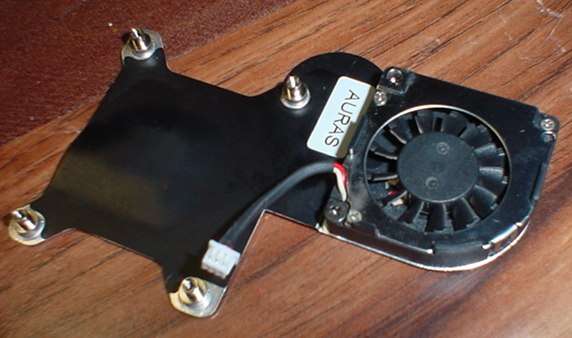
Now it's time to remove
the fan.
There is an easy way and a hard way to do this. The easy way is to
remove the lone remaining black screw from the fan assembly. When you
do, it will lift right off the metal base plate with only a little
encouragement. Once you get it off, you will be able to see the back
bearing. This is what we want to pay attention to. Carefully (and I do
mean carefully) disconnect the wiring from the
video card.
At
this point,
you'll either think I'm completely nuts or resourceful. Whatever the
case may be, the fan you have now isn't something that you can just run
out and pick up from your local electronic parts retailer. Even if you
could, it would probably go bad in about the same length of time.
Whether you agree with me or not, what I'm about to show you has worked
very well for me over many years and countless fans. I haven't had a
one come back with noisy bearings after doing this.
Turn the fan over so you
can see the
manufacturer and information label. Hold the fan in place. Using your
other hand, take your bladed screwdriver and start to peel the fan
label up.
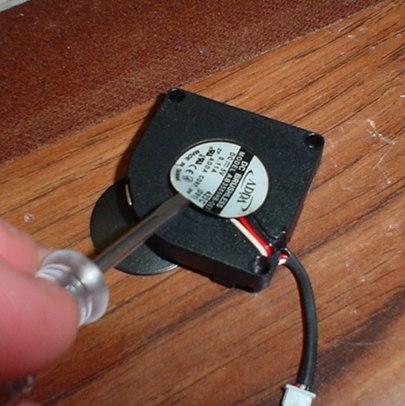
With any kind of luck,
you will see the fan bearing soon.
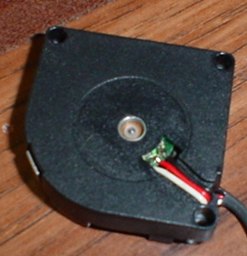
Get some motor oil and a
cotton swab.
Gently moisten the bearing. Work the fan a bit by either twirling the
blades gently (!!) with your finger or blowing on them. Clean up any
excess and put the label back on as best you can. If it won't go back
on, make sure you've cleaned up all the oil residue that didn't go in
the bearing. Failing that, make a new "label" with adhesive tape.
Whatever you do, don't just leave it off. That could be inviting a
disaster.
Screw the fan back to
the metal plate.
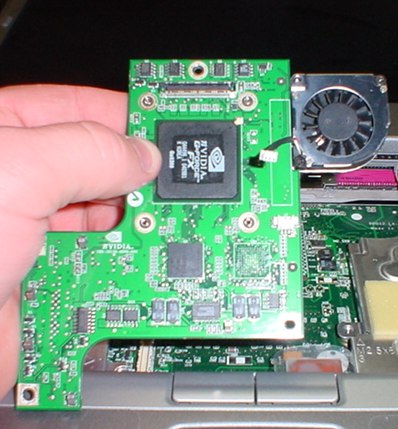
Mate the video card and
fan assembly once again. It will look like this if you got it right:
Plug the video card into
its
connector at the lower left. It should "click" into place. Do NOT force
it. If it doesn't want to go in, check the alignment and try again. It
may take a few tries. Make
sure you plug in the fan power connector!
Fasten the screw by the
display panel connector. You can connect the display panel now if you
want to.
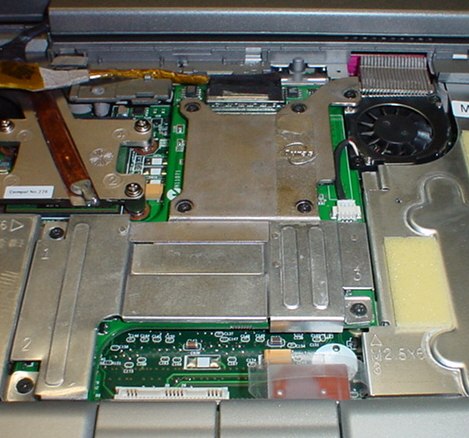
Now you will put the
heatsink and
shielding metal back in place. The thin metal has a kind of "tab" that
you will need to "hook" in under the lower edge of the video card. It
takes some fiddling but can be done. It may help to bend it outwards
gently, seat it and then use your bladed screwdriver to push it back
against the circuit board.
Fasten the rest of the
screws in place, all the while making sure that everything is aligned
properly.
Plug the keyboard back
in. Set it back into place.
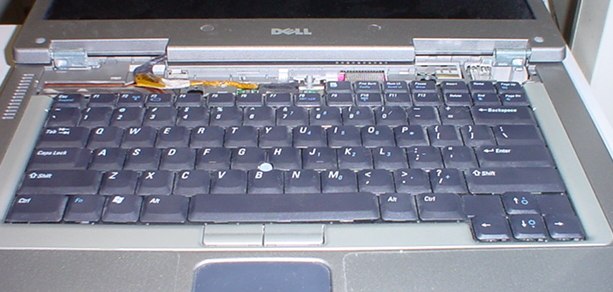
The keyboard needs to be
put in
starting from the spacebar and working your way up to the tips on each
side. It should lay relatively flat when you have it in place. Replace
the two screws that hold it into place.
Find the trim panel and
plug it back
in to the connector near the right hand display hinge. Seat the right
hand corner and continue to work your way left. You will have to push
it down a little to get it back into place.

Make sure you are not
pinching
anything as you seat the trim panel. Push down firmly on the panel to
make sure it is back in place. Reconnect power and reinsert the
battery. Lift the display panel up to a normal viewing angle.
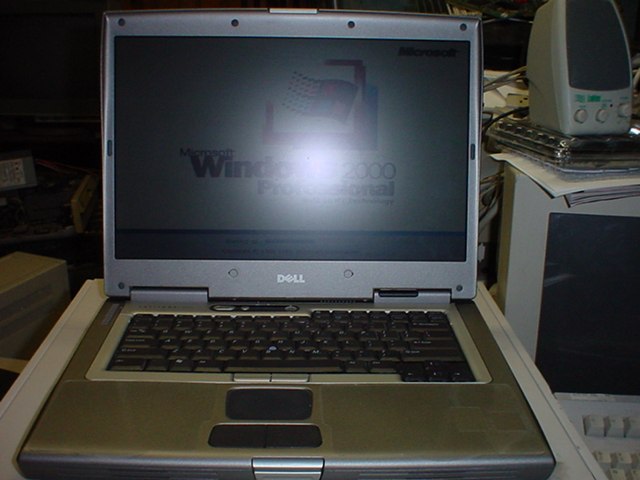
Turn on the computer. It
should start
up right away. If it doesn't, turn it off, disconnect all power and go
over the steps presented here carefully. You may have forgotten to plug
in a connector or something.
Using a utility such as i8kfanGUI, check to be sure that your
fans turn on and run*. Also pay attention to the temperature readings.
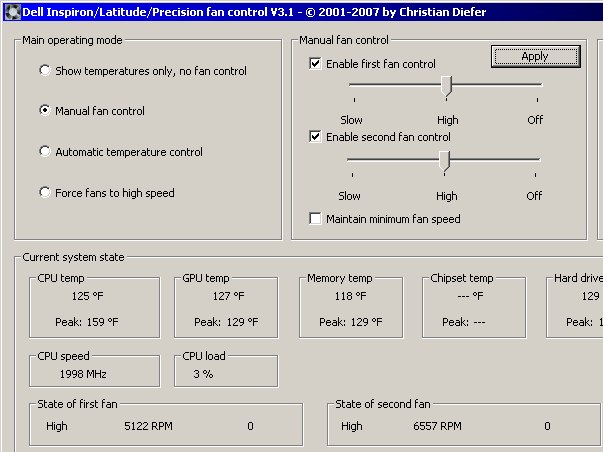
That's it. Now your
Latitude D800's secondary fan will run smoothly and quietly for many
years to come.
Go Back>
Copyright
©2008 William R.
Walsh. All Rights Reserved. Permission is granted to reproduce this
material in whole as long as no fee is assessed for access to this
information outside of costs required to cover connection time or
duplicating expenses. This content is not to be displayed alongside
advertising materials of any type. This information and procedure are
provided in a good faith effort to help owners of Dell Latitude D800
notebook computers repair a noisy secondary fan if their computer has
this problem. It is not intended to solve any other problem or issue.
Any damage to your computer caused by following this procedure is your
responsibility. Do this only at your own risk.
* If you do not want to use i8kfanGUI, the Dell Diagnostics utility
(press F12 at startup on most machines) will test the fans. I don't
know if it tests both fans or not. I do know that it starts the primary
(CPU) fan when it is supposedly testing the video card fan.
If you reproduce this material in any way, you must provide a link or
reference to the original work. You may use portions of this work in
other projects provided that you link back (or supply a reference) to
this page. Such projects may not be illegal, dangerous, rude to others
or displayed with advertising materials of any type.
This page is not affiliated with Dell Computer Corporation in any way.
No one at Dell Computer Corporation has approved or endorsed this
advice.
The palmrest removal illustration featured at the top of this page is
Copyright © Dell Computer Corporation. It is used solely to
display the location of the fan. It is extracted from the Dell Latitude
D800 service manual.


